This tutorial will explain how to containerize a MassTransit service. You should have some familiarity with:
- MassTransit services using TopShelf
- Message Queue (RabbitMQ or Azure Service Bus)
- Basic Docker understanding (although you could be a complete beginner)
- Azure experience (you don’t need to be an expert, but should be familiar with portal.azure.com)
What we plan to accomplish:
- Extend a MassTransit Topshelf (full .NET framework) service to build a docker image
- Publish the docker image to a Azure Container Registry
- Run the image in an Azure Container Instance
Background
While MassTransit support for .NET Standard is fast approaching, some businesses might have MassTransit consumers build which still have dependencies on .NET Framework. But that doesn’t mean we need to stick to deploying our MassTransit services to VM’s and install them as Windows Services. Deploying containers has so many benefits, it makes sense to convert current top shelf services into containers whenever possible.
So I’m assuming you already have a MassTransit service that is deployed using windows services (using TopShelf). If you don’t but wish to follow along with this tutorial, you can use the starter kit service.
Build Docker Image
First off, you need to install Docker for Windows. Once this is done, you will have a system tray icon. You will need to right click on this and choose “Switch to Windows Containers”. This may require your computer to reboot.
Dockerfile
Everything in this dockerfile is taken from the microsoft sample.
FROM:
When you want to create your docker image, you usually specify a base image in which you will build your image ontop of. Because we need .NET Framework, we base our image off of microsoft/dotnet-framework:4.6.2 .
FROM microsoft/dotnet-framework:4.6.2
NOTE: If we were using .NET Standard/Core, we would use a different more lightweight image from microsoft/* (which I will cover in a future post).
Specifies the working directory. It’s a good habit to set an appropriate working directory before copying your bin directory.
WORKDIR /app
Copies the files from a path relative to the dockerfile’s location, into the image you are building. Since the pwd is now /app, this would copy all files in the bin directory into /app/*
COPY StarterKit.Service/bin/Release/net461 .
Pretty simple, allows the container to be configured to run as an executable. This is pretty important, because we need to start our MassTransit Topshelf console application.
ENTRYPOINT ["StarterKit.Service.exe"]
Once you have everything setup in the docker file, make sure you save it. Then in cmd (or powershell which is the default now), run the command
docker build -t starterkit-masstransit .
This will build, with the dockerfile in the current directory (make sure your current directory in powershell is at the same level as the dockerfile, and also make sure that the path you specified in the dockerfile COPY is in the same relation to the current directory. This is all important for a successful image.
Now if you run this container, you can see that it will start listening, just as a topshelf service will when executed as a console app.
docker run --name mystarterkit --rm starterkit-masstransit
The –rm will make sure the container is deleted after it exits. I also suggest you look at the difference between docker run and docker start.
NOTE: To stop the container, open another powershell and execute…
docker stop --time 10 mystarterkit
Now before we can deploy this container to Azure, we must extract out any environment specific settings.
Extend MassTransit Service
A few things that will need to be done before we can containerize your service are as follows:
- If you log to a windows event log, or flat file log, I recommend logging to a central location. When you start to build up infrastructure that can be scaled out and in based on demand, it becomes cumbersome to continue logging to flat files. However you could still log to a file location and your Docker Container could mount a virtual drive, which could persist through construction/destruction. This tutorial will assume you use a central logging mechanism (e.g. Seq, SqlDb, NonRelationalDb, etc…). The sample provided uses Azure CosmoDb for central logging.
- Identify environment specific settings, because the whole benefit of Continuous Integration and Continuous Delivery is the ability to deploy the same artifact/package to each environment with minimal (if any) changes.
Centralize Logging
This is already done with our sample service. If you are following this tutorial for your own service, I’m going to leave this as a choice for the reader.
Environment Specific Settings
Without getting into the nitty gritty for preferences on build artifacts and environment settings, there are some options we have for providing environment specific settings (I’m mainly talking about connection strings,auth keys, etc…)
- You use mechanisms to tweak/replace specifc app settings at deploy time (WebDeploy, xml transforms, etc…).
- You use more enterprise level mechanism (e.g. etcd, consul…), and fetch these settings at startup/runtime.
- Neither of the above, maybe make a package/artifact for each environment at build time.
I don’t want to get into the opinions about what school of thought is the best, because developers can be quite opinionated. Instead I will mention the mechanism you could use with docker, depending on which one you current CI workflow falls under.
- Docker –env or –env-list. Basically set environment variables within the docker at container creation time, then we can easily pass in our environment specific values for each environment.
- No change at all (…kinda)! You will likely still need to securely connect to your distributed key/value store, but this can be accomplished different ways, and is a combo of dev and devops. I won’t go into the specifics, because it can vary depending on your setup.
- You would probably create a dockerfile per environment, similar to creating a package per environment.
For the purposes of this tutorial we will be using Option 1 (environment variables).
So in our sample solution, we have quite a few app settings, but we have identified the two that need to change per environment. So we go into our boostrapping code and read from the environment variable name instead of the Configuration Manager’s AppSettings. We’ve done this in our AzureServiceBusBusFactory.cs and TopshelfSerilogBootstrapper.cs.
In the sample project, we’ve pulled these two settings out into environment variables named AzureSbConnectionString and CosmoDbAuthKey . So we will have to make sure we provide these as environment variables. We will remember this for later.
Don’t forget to rebuild in Release configuration, and then perform a docker build again, with these changes.
Add –env flag for Docker Run
Now add the environment variables to the docker run command
docker run --name mystarterkit --rm --env AzureSbConnectionString=<sbconnectionstring> --env CosmoDbAuthKey=<myauthkey> starterkit-masstransit
And it will run the service, the same as before, but instead it is getting the environment specific values from the environment variables.
Azure Container Registry
Now we have an image ready to publish to our azure container registry. Before we can publish, we need to create this registry in azure (if we don’t already have one).
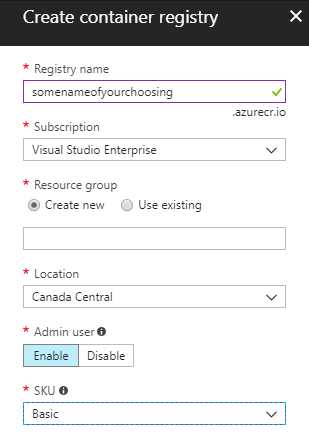
- In your azure portal, add an “Azure Container Registry”, with these settings:
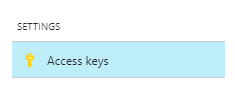
- Once the resource is done initializing, browse to the container registry in the list of resources, and click on the “Access Keys”. Copy password or password2. It doesn’t matter which one.
- In powershell on your local computer, enter
docker login <yourregistryname>.azurecr.io
with username: <yourregistryname>
password: <paste the password or password2> - Tag the image with the container registry name (I added :v1.0.0 for the additional tag of the version, you can leave this off if you like).
docker tag mystarterkit <yourregistryname>.azurecr.io/starterkit-masstransit:v1.0.0
- Push the image now to the registry.
docker push <yourregistryname>.azurecr.io/starterkit-masstransit
This might take some time to upload (Mine was about ~980MB). This should be much faster when using .NET Standard with Masstransit V4, because of the reduced image size. But for now, this is what we have to work with.
Azure Container Instances
The hard part is over. We’ve made our image, and uploaded it to our private docker registry. All we need to do now is create a container instance (in a resource group), and pass in our environment variables.
- First, this is easier with Azure CLI (and I don’t see how you can pass environment variables within Azure Portal), so please download the latest version of Azure CLI and install it. Once done, give az access to your account access with az login .
- Azure Container Instances requires an empty resource group, so run this command to create one.
az group create --name mystarterkit --location eastus
- Now this is the large command, where it creates the container instance with all the parameters.
az container create --name starterkit-masstransit --image <yourregistryname>.azurecr.io/starterkit-masstransit:v1.0.0 --cpu 1 --memory 1 --os-type Windows --registry-password <passowrd or password2> --environment-variables "AzureSbConnectionString=<putinconnectionstring>" "CosmoDbAuthKey=<putinauthkey>" --resource-group mystarterkit
- Now it might take a bit of time to start, but once it does you can view that it has a running state in Azure Portal.

- You can also view the console logs with this command:
az container logs --name starterkit-masstransit -g mystarterkit
And lastly, to verify the service can receive messages, we will publish a message to the bus with our local solution, and then view the logs.

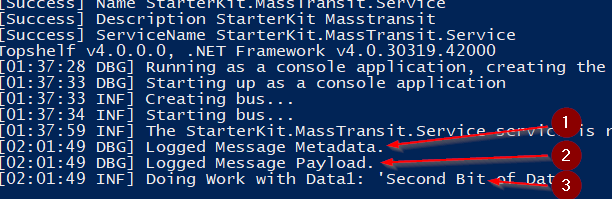
So you will notice that because console logging uses a Message Formatter, which defaults to [{Timestamp:HH:mm:ss} {Level:u3}] {Message:lj}{NewLine}{Exception} we miss some data that is captured with our Serilog Audit Logger. This is captured with the CosmoDb logs. I really like it’s ability to destructure the objects when logging. So here’s what those last three console logging lines look like from Cosmo Db.
(1)
{
  "EventIdHash": 3786104064,
  "Timestamp": "2017-12-30 02:01:49.869+00:00",
  "Level": "Debug",
  "Message": "Logged Message Metadata.",
  "MessageTemplate": "Logged Message Metadata.",
  "Exception": null,
  "Properties": {
    "MessageMetadata": {
      "MessageId": "04cb0000-2398-4215-52e0-08d54f294a06",
      "ConversationId": "04cb0000-2398-4215-fcb3-08d54f294a07",
      "CorrelationId": null,
      "InitiatorId": null,
      "RequestId": null,
      "SourceAddress": "sb://<yourservicebus>.servicebus.windows.net/DESKTOP4V7PB3H_testhostx86_bus_yufoyybdubbbm9w1bdkw6kkbb1?express=true&autodelete=300",
      "DestinationAddress": "sb://<yourservicebus>.servicebus.windows.net/StarterKit.Contracts/DoSomeWork",
      "ResponseAddress": null,
      "FaultAddress": null,
      "ContextType": "Consume",
      "Headers": {},
      "Custom": null
    },
    "SourceContext": "StarterKit.Service.Middlewares.SerilogMessageAuditStore",
    "EnvironmentUserName": "User Manager\\ContainerAdministrator",
    "MachineName": "2005C6CF48DA"
  },
  "ttl": 86400,
  "id": "1b468300-bf37-5409-6333-7a22a8e84c63"
}
(2)
{
  "EventIdHash": 2934481351,
  "Timestamp": "2017-12-30 02:01:49.871+00:00",
  "Level": "Debug",
  "Message": "Logged Message Payload.",
  "MessageTemplate": "Logged Message Payload.",
  "Exception": null,
  "Properties": {
    "MessagePayload": {
      "Data1": "Second Bit of Data",
      "Data2": 87,
      "Data3": [
        "Apple",
        "Pear",
        "Orange"
      ]
    },
    "SourceContext": "StarterKit.Service.Middlewares.SerilogMessageAuditStore",
    "EnvironmentUserName": "User Manager\\ContainerAdministrator",
    "MachineName": "2005C6CF48DA"
  },
  "ttl": 86400,
  "id": "7741c88b-5599-b07a-bf46-896448d521ce"
}
(3)
{
  "EventIdHash": 1752422595,
  "Timestamp": "2017-12-30 02:01:49.914+00:00",
  "Level": "Information",
  "Message": "Doing Work with Data1: 'Second Bit of Data'",
  "MessageTemplate": "Doing Work with Data1: 'Second Bit of Data'",
  "Exception": null,
  "Properties": {
    "SourceContext": "StarterKit.Module.Consumers.DoSomeWorkConsumer",
    "EnvironmentUserName": "User Manager\\ContainerAdministrator",
    "MachineName": "2005C6CF48DA"
  },
  "ttl": 86400,
  "id": "5dadf589-e25f-e202-6116-e6b69dfa9dba"
}
Wrapping Up
As you can see, there’s a lot of benefit to containerization, and adding this to your CI/CD workflow is pretty straightforward. You will want to make sure to take more careful care with Versioning/Tags when creating images. It takes a bit of time to wrap your head around docker images, containers, repositories, tags, etc… There are many explanations available to help understand them, just use your favorite search engine and you should find some in no time.
Here’s some links I found Useful when creating this tutorial: