MassTransit Autofac Request and Response

Messages send with MassTransit typically are fire and forget. This is because distributed systems operate in different processes on different machines, giving it the benefit of horizontal scaling (with trade offs, but that’s another discussion entirely). However, the need may arise to use request + response in a distributed system. So this tutorial will show how this can be achieved with MassTransit.

If you have followed some of my other tutorials, you will know that I like to separate the RabbitMQ config with a virtual host and username specific to the tutorial. My config for this tutorial is:

<add key="RabbitMQHost" value="rabbitmq://localhost/tutorial-req-resp" />
<add key="RabbitMQUsername" value="tutorial-req-resp" />
<add key="RabbitMQPassword" value="apple" />

This tutorial will simply show the main components required to set up a Request/Response with MassTransit. You can follow along with the completed project here.

*Update*: When I had drafted this, the MassTransit Documentation didn’t have an example for Request/Response. Now there is excellent documentation here. So I will reduce the scope of this tutorial to registering the IRequestClient<…> in an Ioc Framework (Autofac).

Tutorial

When using Publish + Subscribe, we typically get the IBus or IBusControl injected and use the .Publish or .Send methods to fire and forget. But for Request Response, we will use IRequestClient<…>. Open up RequestClientModule.cs. You will see:

Uri address = new Uri(ConfigurationManager.AppSettings["ServiceFullUri"]);
TimeSpan requestTimeout = TimeSpan.FromSeconds(30);

builder.Register(c => new MessageRequestClient<CheckOrderStatus, OrderStatusResult>(c.Resolve<IBus>(), address, requestTimeout))
    .As<IRequestClient<CheckOrderStatus, OrderStatusResult>>()
    .SingleInstance();

Line 4: This is where our concrete type MessageRequestClient is constructed, which is one of the many value adds for MassTransit. It handles the plumbing of creating a RequestId and correlates messages accordingly.

You might be wondering why I used MessageRequestClient? Because in the official sample, a helper extension method is used instead. If we look at the MassTransit source, we will see the extension is just that, a helper:

public static IRequestClient<TRequest, TResponse> CreateRequestClient<TRequest, TResponse>(this IBus bus, Uri address, TimeSpan timeout,
    TimeSpan? ttl = default(TimeSpan?), Action<SendContext<TRequest>> callback = null)
    where TRequest : class
    where TResponse : class
{
    return new MessageRequestClient<TRequest, TResponse>(bus, address, timeout, ttl, callback);
}

So in our RequestClientModule.cs, you could replace the builder.Register with:

builder.Register(c =>
{
    var bus = c.Resolve<IBus>();

    return bus.CreateRequestClient<CheckOrderStatus, OrderStatusResult>(address, requestTimeout);
})
    .As<IRequestClient<CheckOrderStatus, OrderStatusResult>>()
    .SingleInstance();

Then you would get the exact same behavior. Choose whatever method you prefer.

Now we take a quick peek in the Consumer. Open up CheckOrderStatusConsumer.cs and you will see:

public async Task Consume(ConsumeContext<CheckOrderStatus> context)
{
    Console.Out.WriteLine("Received OrderId: " + context.Message.OrderId);
    context.Respond(new SimpleOrderStatusResult { OrderMessage = string.Format("Echo the OrderId {0}", context.Message.OrderId) });
}

And the important line here is context.Respond(…). This is the other part of the MassTransit value add plumbing. It makes sure that it responds and retains the RequestId. You can actually look and see what the RequestId is with context.RequestId .

There you have it, pretty simple, but powerful features provided by MassTransit ontop of whatever message transport (eg. RabbitMQ, AzureSB) you choose.

Enjoy!
MassTransit Send vs. Publish

MassTransit is capable of a lot, and one important feature is Send vs Publish. If you read the official documentation section “creating a contract“, it talks about commands (send) and events (publish). This makes sense, because commands you want to only be executed once, however events can be observed by one or more listeners.

This tutorial will look at what is happening with the two different message types. To follow along, download the completed project here. The only thing you will need to do is create a virtual host and user in RabbitMQ. Other tutorials for MassTransit typically use the default RabbitMQ guest/guest account, but I prefer to separate mine into virtual hosts. So open the solution and look in either of the three services App.config or the Mvc Web.config. You’ll see:

<add key="RabbitMQHost" value="rabbitmq://localhost/tutorial-send-vs-publish" />
<add key="RabbitMQHostUsername" value="tutorial-send-vs-publish" />
<add key="RabbitMQHostPassword" value="chooseapassword" />

So browse to http://localhost:15672, login as admin and configure. I make the virtual host and username the same. Then choose a password you want. After it’s setup run the solution and try it out!

Tutorial

I started with the Mvc StarterKit and created 3 services. One service is for the events (in practice it could be 1..n). The other two services for commands have artificially fast and slow processing speeds. This was done to illustrate that although X quantity of commands are queued, they are only processed once (well, once or more to be honest, as RabbitMQ is a ‘at least once’ message broker).

Note #1: Commands and events are both usually defined as interfaces. Therefore using descriptive names helps discern commands from events.

Publish (Events)

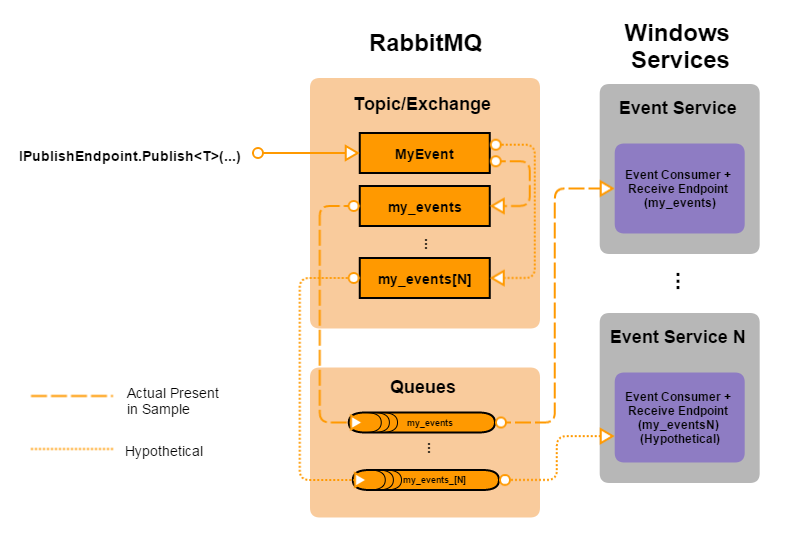
Lets use a post office and mailbox to help describe publish. An event in MassTransit is akin to flyer’s that we receive in the mail. They aren’t directly addressed to us, but everybody who has a mailbox gets them. So flyer = event, and mailbox = endpoint. When building your bus and registering an endpoint like so: sbc.ReceiveEndpoint(…), one has to be sure that the queueName parameter is unique. This is emphasized in the “common gotcha’s” part of the documentation. Now although it’s called queueName, it actually makes an Exchange and Queue pair, both named after the queueName parameter.

The below diagram shows the MyEvent flow in the sample project.

send-vs-publish_2r2

Although the sample doesn’t have multiple event services, I added my_events[N] just to show you each new service (and receive endpoint) will have a corresponding exchange+queue pair made.

Note #2: Now when I’ve used MassTransit and RabbitMQ, I’ve never worked with high traffic projects that result with queue or service bottlenecks. I believe RabbitMQ can be thrown quite a lot and keep up, but if you are encountering thresholds for RabbitMQ or the service, then you will need to think about RabbitMQ clustering, or adding more services (perhaps even scaling out services). But these are highly specialized and more advanced topics. My advice would be to use the MassTransit and RabbitMQ community discussion boards or mailing lists.

Send (Commands)

Commands should only be executed once (although you should be aware if making commands idempotent, but we will not cover this more complex topic in this tutorial). So in our scenario above (publish), if we have multiple services (ie. multiple endpoints) for the same contract type, we will have a single command being executed by many consumers. So rather than publish, we send a command to a specific queue+exchange pair. Then, our services can connect to the same receive endpoint’s queueName so long as they have the same consumers registered. I’m paraphrasing this important point from the documentation.

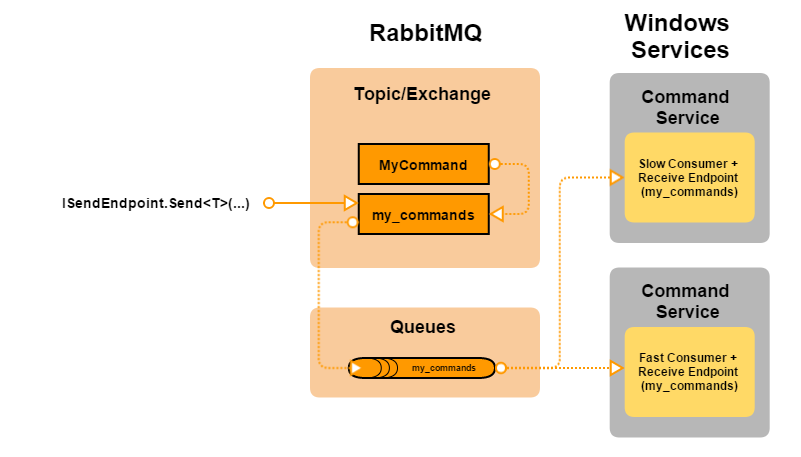
Here’s the MyCommand flow in the sample project.

send-vs-publish_2

The one main difference is the Message is sent directly to the my_commands endpoint exchange, rather than the MyCommand contract exchange. This avoids the contract exchange fan-out. In the sample, we also chose our services to subscribe to the same endpoint (as I made sure they both had the same consumers registered). I cheated a little and added a different sleep time to each consumer.

Code Comparison

To publish:

await _bus.Publish<MyEvent>(...);

Pretty simple, nothing to explain here

To send:

var sendEndpoint = await _bus.GetSendEndpoint(new Uri(ConfigurationManager.AppSettings["MyCommandQueueFullUri"]));
await sendEndpoint.Send<MyCommand>(...);

The big difference, we have to get our send endpoint first by passing in the Full Uri.

I hope this has helped clarify commands vs events, and when to use each. The next post I have planned will look at Transient vs Persistent exchanges+queues.

Starter Kit for ASP.NET MVC, MassTransit, and Autofac


Chris has done a great job providing Samples for simple and complex use cases with MassTransit. I recommend looking at the Shopping Cart sample and my complimentary post.

I want to write more SOA+MassTransit tutorials covering a wide range of scenarios for scalable and robust web applications, but I need a good jumping off point for the reader and myself to start from. So I’ll be making some Starter Kits available on Github to help provide an equal and familiar starting point for my tutorials. This is a learning process for both you and me, and I want to give the best and most accurate advice.

I like to construct my projects roughly following Jeffery Palermo’s Onion Architecture. The onion architecture might seem like overkill to use for the simple example of the Starter Kit. However I will be writing more tutorials, and when they get more complex, this organizational architecture will help keep things concise, and should (I hope) make it easier for the reader (you) to follow along.

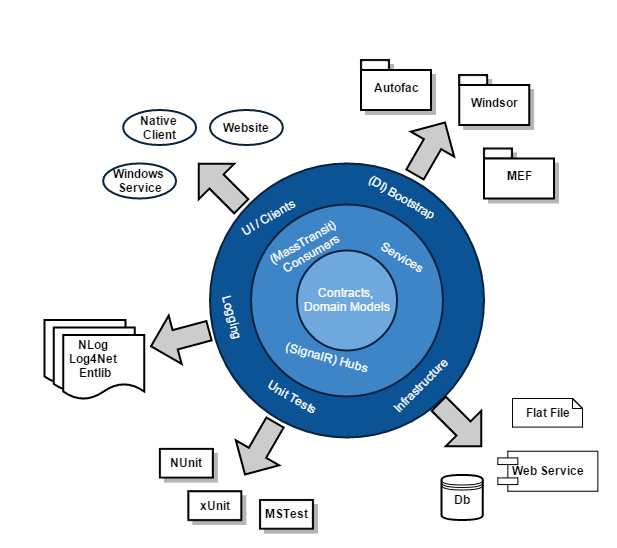
Onion Architecture Approach (Quickly Explained)

starterkit-onion-architecture_1

One important concept is that layers can only have dependencies on their current layer, or more Inner Layers (or external nuget dependencies if necessary). So for example the Contracts and Domain Models should really only reference .NET Framework, nothing else.

Centre: This layer will typically contain our Contracts (Interfaces) and Domain Models or POCO (for ORM). There should be no business logic or type verification. This should be done in another (more outer) layer.

Middle: This layer houses services that contain implementation for our contracts. This layer could be further split into Domain Services and Application Services, but for simplicity we will just leave them as the Middle layer for now. I’ve provided some examples in the diagram such as; MassTransit Consumers, SignalR Hubs, CQRS services (eg. something like Mediatr).

Outer: The outer most layer typically has a variety of items, which end up tying together the services with concrete assemblies and infrastructure. For example, MassTransit (and projects I’ve worked on in the past) use a logging mechanism called LibLog. I am a huge fan of this, because it doesn’t restrict you to a specific logging implementation. So in the outer most layer, all you have to do is add your dependency to NLog, EntLib, or log4net, and configure it (using code or app.config), and your off to the races. None of your inner layers have any dependency on any logging system (LibLog works by simply adding a *.cs file to your projects). The same idea applies for other infrastructure you wire up such as; what ORM you use, the Storage type, the DB provider, the unit testing (and mocking) libraries, which CQRS pattern, or what logging framework to use.

Starter Kit – Autofac, MassTransit, Mvc

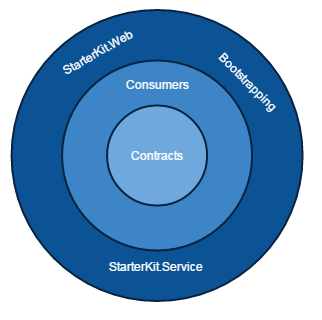
The Starter Kit can be found here, and below is the architecture.

Update Oct. 24, 2015: I’ve added another starter kit here, which includes SignalR.

starterkit-architecture_2

The Starter Kit compiles and runs a simple message (publish and subscribe) example. You can see the message sent from the webpage in the console service running.

Logging Explained

I want to take a moment to explain the logging option used. I’ve been around the block when it comes to logging for .NET, and by far the best technique I’ve encountered so far is LibLog. It lets you choose your favorite, and there is no DLL dependency in your libraries. Only the final executable that wires up the logger of your choice (log4net, nlog, entlib, etc…). So in the Starter Kit, I chose log4net, and if you look in StarterKit.Web (Web.config), or StarterKit.Service (App.config), you will see log4net’s configuration.

Logging Level in StarterKit

Because MassTransit, and Topshelf both use LibLog, our logs can become crowded if we set the global log level to debug. So you’ll notice in the *.config, that I set the root level to info and I set the StarterKit.* namespace level to debug.

<root>
  <level value="INFO" />
  <appender-ref ref="RollingFile" />
</root>
<logger name="StarterKit.*">
  <level value="DEBUG" />
</logger>

This keeps the logs clean if you are trying to debug your code. And of course, if you are having trouble with MassTransit, and need to post logs in the google discuss group to get help, the library contributors might ask for logs so they can help diagnose your issue. In that case you would want to change the root level to debug and run + capture the logs.

So go clone the Starter Kit and start experimenting!

Sagas, Scheduling, and Shopping Cart… Under the Covers

A few weeks ago, Chris published a Sample-ShoppingWeb with a supporting blog post (a good foundation to understand the Sample), which showcases how to implement a expiring shopping carts, complete with a Saga and Quartz Scheduler. This sample code really starts to show the power of MassTransit, going beyond simple PubSub and ReqResp functionality. However I like to know how things work, and visualizing the flow really helps me understand what’s going on under the covers. So please read on if you are curious as well!

First, try it yourself

Download the Sample-ShoppingWeb and run it on your machine. Make sure you either have a guest/guest account in RabbitMQ, or quickly setup a virtual host in RabbitMQ web console (similar to how I did in Step 2 here) for the shopping cart.

Once you have your solution up and running, you can see how adding fake items to a users cart will start the expiration countdown (and adding more items will refresh it). If the countdown elapses, the cart is destroyed. A lot is going on here, but I will try to break it down in steps.

Exchanges/Queues

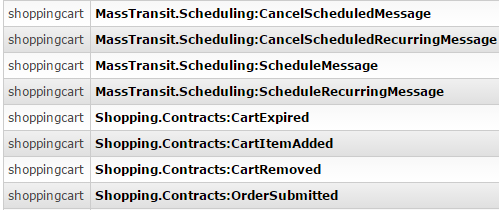
After you have run the sample, you will notice in the RabbitMQ web console there are these exchanges:

exchanges_1

The first 4 are created by our Scheduler, the second 4 are created by the Saga. Each of these 4 exchanges can be viewed as two groupings. If you look in the TrackingServices.cs at this code snip:

...
x.ReceiveEndpoint(host, "shopping_cart_state", e =>
{
    e.PrefetchCount = 8;
    e.StateMachineSaga(_machine, _repository.Value);
});

x.ReceiveEndpoint(host, ConfigurationManager.AppSettings["SchedulerQueueName"], e =>
{
    x.UseMessageScheduler(e.InputAddress);
    e.PrefetchCount = 1;

    e.Consumer(() => new ScheduleMessageConsumer(_scheduler));
    e.Consumer(() => new CancelScheduledMessageConsumer(_scheduler));
});
...

You’ll see that two receive endpoints are made, and if you look at the Queues in the RabbitMQ web console, you’ll see sample_quartz-scheduler and shopping_cart_state. So each of the grouping of 4 Exchanges will send all messages to their respective queue.

Flow Diagram

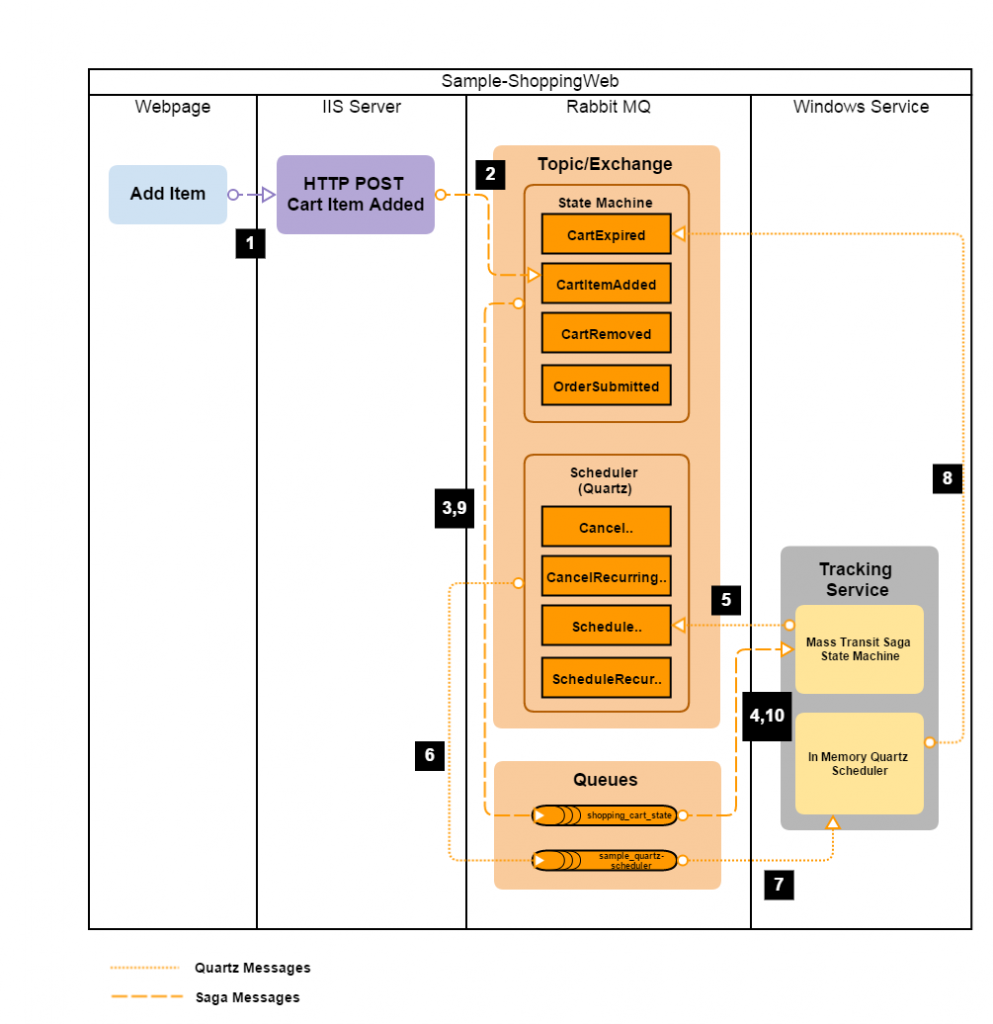
The example of clicking the “Add Item” button once on the Cart webpage is as follows:
flow_2

Okay, so there’s a lot going on here, so I’ll break it down into the numbered steps shown in the picture.

  1. The webpage performs a Form submit (using HTTP POST). The input field is meant to hold the username (a unique identifier for the cart). Any one username can only have one active cart at a time.
  2. The MVC controller receives this HTTP POST message, and creates a message CartItemAdded and publishes it to the Service Bus (RabbitMQ).
  3. The message is received in the appropriate exchange, and then sent to the queue shopping_cart_state.
    The TrackingService is running in a TopShelf service, and is listening with consumers on each queue. One group of consumers (handled by the Saga Repository) is listening to the saga queue, the other grouping (handled by the Quartz Scheduler) listens to the scheduler queue.
  4. The saga state machine sees the CartItemAdded and starts a new state machine. This state is saved to the local database using Entity Framework.
  5. A schedule message is kicked off from the state machine for 10 seconds into the future.
  6. The schedule message is passed along to the sample_quartz-scheduler.
  7. The in memory scheduler receives the message and will take actions when the schedule message indicated. (Quartz has the capability to run with a persistent mechanism, because if the TrackingService crashed before the 10 seconds was triggered, the cart would not be expired).
  8. The 10 second mark has passed, and the scheduler sends a CartExpired message.
  9. The message is passed to the saga queue from the exchange.
  10. The Tracking Service gets the CartExpired message, and it first looks in the DB to see if a state instance already exists (using the CorrelationId). It finds the saved state, loads it, and then raises the CartExpired event to follow the State Machine flow. This event ends the state machine and deletes it’s entry from the database, because the state machine has set SetCompletedWhenFinalized(); .

Now as you can see, quite a lot happened after you pressed that “Add Item” button. So hopefully this explanation helped clear some of the confusion. Don’t be intimidated by MassTransit, it’s a powerful tool and when used correctly, you can solve some difficult problems.

Now I’ll leave this optional exercise for the reader. How does the flow I explained above change if the user pressed “Add Item” again after 5 seconds (for the same user of course)?