MassTransit with Azure Service Bus

One of the great features of MassTransit is the abstraction it provides over the message transport. This allows you to forget about the plumbing and focus on distributed application design and development.

Now would be a great opportunity to take one of our past tutorials and convert it from RabbitMQ to Azure Service Bus. It will become very clear how easily you can switch from one message transport to another. The completed project for this tutorial can be found here under the azure-service-bus branch.

Tutorial

First, clone the master branch from this tutorial. Don’t worry if you don’t have RabbitMQ setup locally, because we will be switching the solution to use Azure Service Bus.

Create an Azure Service Bus

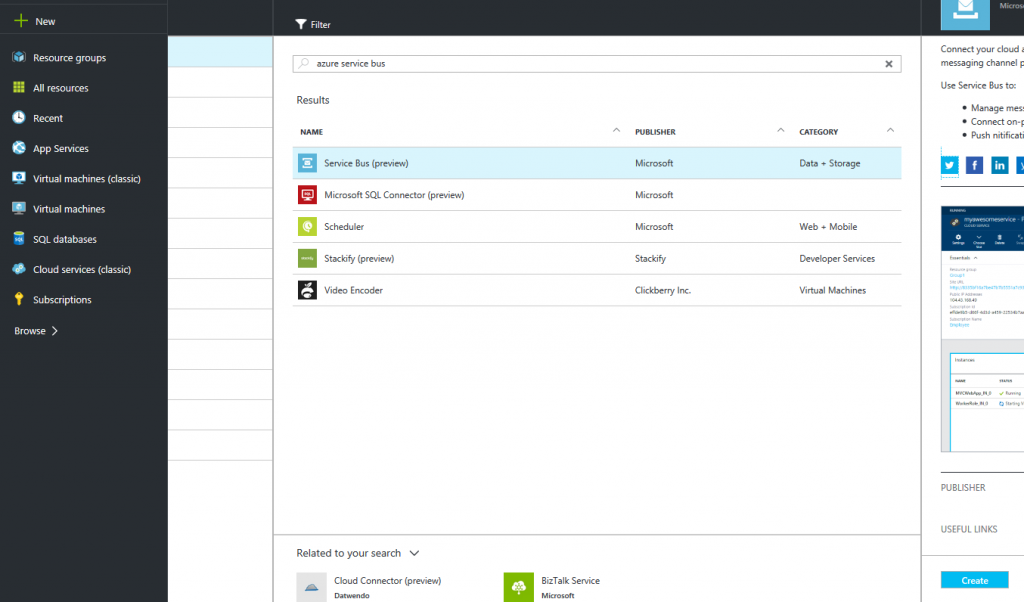
The first thing we need to do is create an AzureSB for this project. You can use a free trial, or if you have an MSDN License that works too. You’ll want to log into https://portal.azure.com. Once at the dashboard screen, follow these steps:

  1. Click New, and search for “azure service bus” or “service bus”. Then select it, and click “Create”.
    tutorial-req-resp_azure_1
  2. Within the Create window, you will want to enter settings:
    Name: <this will be your namespace>
    Pricing Tier: <Must be Standard or higher, MassTransit needs Topics and Queues>
    Resource group: <I made a new one, but you can choose existing if you have one>
    tutorial-req-resp_azure_2
  3. Wait a bit while it creates/deploys the Service Bus
    tutorial-req-resp_azure_3
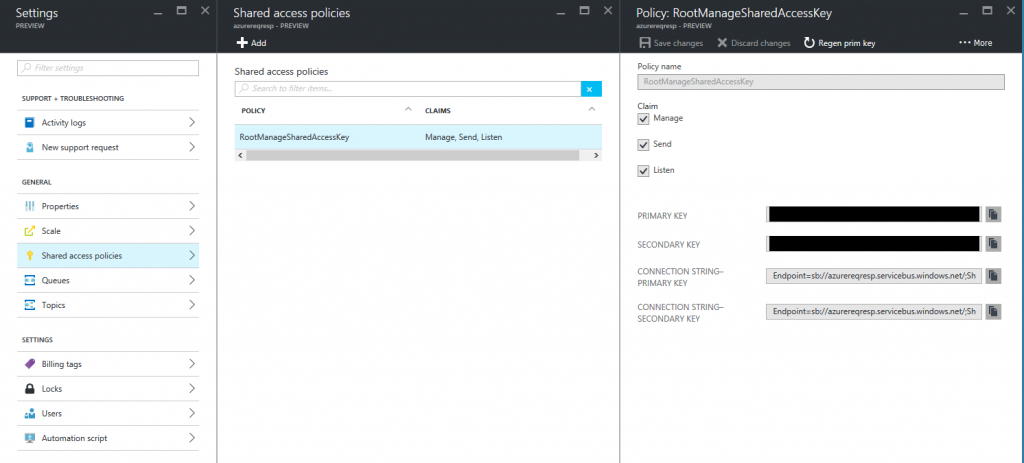
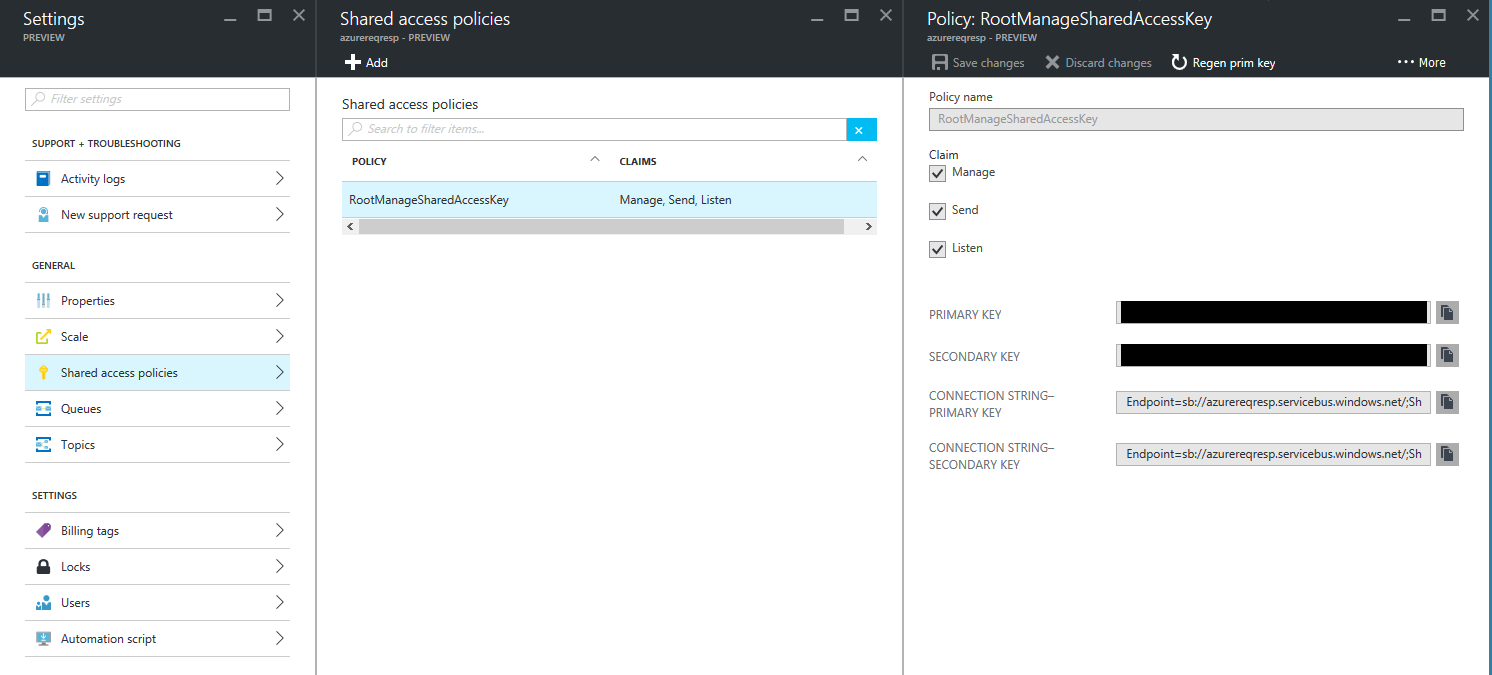
  4. Once Created, you will want to click “Shared access policies”, Choose “RootManageSharedAccessKey” and then leave this window open, because we will need to copy the primary key values into our App.config and Web.config.

Update the Project Configs

Before we update our project IoC with the Azure SB transport, we need to add the Azure Key Name and Shared Access Key for the Service Bus we made in the previous section.

  1. Open your App.config in the StarterKit.Service project. Add the 4 lines with Azure configuration as follows:
    <appSettings>
      <add key="AzureSbNamespace" value="azurereqresp" />
      <add key="AzureSbPath" value="TutorialReqResp" />
      <add key="AzureSbKeyName" value="RootManageSharedAccessKey" />
      <add key="AzureSbSharedAccessKey" value="+yourlongkeyhere=" />
      <add key="RabbitMQHost" value="rabbitmq://localhost/tutorial-req-resp" />
      <add key="RabbitMQUsername" value="tutorial-req-resp" />
      <add key="RabbitMQPassword" value="apple" />
      <add key="ServiceQueueName" value="order_status_check" />
    </appSettings>

    Line 2: This must match the namespace you used when creating the Azure Service Bus
    Line 3: This can be a path of your choosing, similar to RabbitMQ’s virtual host. A logical separation for different topics and queues within the same namespace
    Line 4: Leave this as is
    Line 5: Paste in your shared access key (continue reading to see how you obtain the Shared Access Key)

  2. Open your Service Bus in Azure Portal. Then click Settings -> Shared access policies -> Root manage shared access key. You can copy the Primary key (or secondary, it doesn’t matter) and paste it into your App.config.
    tutorial-req-resp_azure_4
  3. Now open Web.config in StarterKit.Web and add the same 4 lines, plus a new 5th line.
    <appSettings>
      <add key="AzureSbNamespace" value="azurereqresp" />
      <add key="AzureSbPath" value="TutorialReqResp" />
      <add key="AzureSbKeyName" value="RootManageSharedAccessKey" />
      <add key="AzureSbSharedAccessKey" value="+yourlongkeyhere=" />
      <add key="AzureQueueFullUri" value="sb://azurereqresp.servicebus.windows.net/tutorialreqresp/order_status_check/" />
      <add key="RabbitMQHost" value="rabbitmq://localhost/tutorial-req-resp" />
      <add key="RabbitMQUsername" value="tutorial-req-resp" />
      <add key="RabbitMQPassword" value="apple" />
      <add key="ServiceFullUri" value="rabbitmq://localhost/tutorial-req-resp/order_status_check" />
      <add key="webpages:Version" value="3.0.0.0" />
      <add key="webpages:Enabled" value="false" />
      <add key="ClientValidationEnabled" value="true" />
      <add key="UnobtrusiveJavaScriptEnabled" value="true" />
      <add key="owin:AppStartup" value="StarterKit.Web.Bootstrapper.Startup, StarterKit.Web.Bootstrapper" />
    </appSettings>

    Line 6: This should look familiar if you followed the original req-resp tutorial here. Because the RequestClient needs to connect to a specific endpoint (queue), we need to provide the full Uri that we can access the queue in Azure. The uri of queues can be determined fairly easily, here’s a quick explanation: sb://<namespace>.servicebus.windows.net/<path>/<queue_name>

Add MassTransit Azure Packages and Register with our Container

Great. Now we have our configuration settings saved and ready to use. Now all we have to do it change the container we register in our IoC of both the StarterKit.Service and StarterKit.Web projects. We don’t need to change a single line of business logic code in our app. Thank you MassTransit!

First, you will need to install the nuget package MassTransit.AzureServiceBus in both the StarterKit.Service and StarterKit.Web.Bootstrapper.

StarterKit.Service Changes

Once complete, create a new file in StarterKit.Service/Modules named AzureServiceBusModule.cs.

Paste the following in the file.

public class AzureServiceBusModule : Module
{
    private readonly System.Reflection.Assembly[] _assembliesToScan;

    public AzureServiceBusModule(params System.Reflection.Assembly[] assembliesToScan)
    {
        _assembliesToScan = assembliesToScan;
    }

    protected override void Load(ContainerBuilder builder)
    {
        // Creates our bus from the factory and registers it as a singleton against two interfaces
        builder.Register(c => Bus.Factory.CreateUsingAzureServiceBus(sbc =>
        {
            var serviceUri = ServiceBusEnvironment.CreateServiceUri("sb", ConfigurationManager.AppSettings["AzureSbNamespace"], ConfigurationManager.AppSettings["AzureSbPath"]);

            var host = sbc.Host(serviceUri, h =>
            {
                h.TokenProvider = TokenProvider.CreateSharedAccessSignatureTokenProvider(ConfigurationManager.AppSettings["AzureSbKeyName"], ConfigurationManager.AppSettings["AzureSbSharedAccessKey"], TimeSpan.FromDays(1), TokenScope.Namespace);
            });

            sbc.ReceiveEndpoint(host, ConfigurationManager.AppSettings["ServiceQueueName"], e =>
            {
                // Configure your consumer(s)
                e.Consumer<CheckOrderStatusConsumer>();
                e.DefaultMessageTimeToLive = TimeSpan.FromMinutes(1);
                e.EnableDeadLetteringOnMessageExpiration = false;
            });
        }))
            .SingleInstance()
            .As<IBusControl>()
            .As<IBus>();
    }
}

Line 15: This helper method from Microsoft.ServiceBus namespace lets us construct our service Uri. You will notice that this uri is the same as our queue in the previous section, sans /<queue_name>.
Line 19: This also uses a helper method to create the Token Provider for us, providing all the proper pieces of information.

Last but not least, head over to IocConfig.cs and change the line:

// Old Registration
//builder.RegisterModule(new BusModule(Assembly.GetExecutingAssembly()));

// New Registration
builder.RegisterModule(new AzureServiceBusModule(Assembly.GetExecutingAssembly()));

Done!

StarterKit.Web.Bootstrapper

Almost there. I guess you can probably imagine we now need to create a new file at StarterKit.Web.Bootstrapper/Modules/AzureServiceBusModule.cs. Paste in the following:

public class AzureServiceBusModule : Module
{
    protected override void Load(ContainerBuilder builder)
    {
        // Creates our bus from the factory and registers it as a singleton against two interfaces
        builder.Register(c => Bus.Factory.CreateUsingAzureServiceBus(sbc =>
        {
            var serviceUri = ServiceBusEnvironment.CreateServiceUri("sb", ConfigurationManager.AppSettings["AzureSbNamespace"], ConfigurationManager.AppSettings["AzureSbPath"]);

            var host = sbc.Host(serviceUri, h =>
            {
                h.TokenProvider = TokenProvider.CreateSharedAccessSignatureTokenProvider(ConfigurationManager.AppSettings["AzureSbKeyName"], ConfigurationManager.AppSettings["AzureSbSharedAccessKey"], TimeSpan.FromDays(1), TokenScope.Namespace);
            });
        }))
            .SingleInstance()
            .As<IBusControl>()
            .As<IBus>();
    }
}

Again, same as previous, but we obviously don’t need to create the endpoint here. Instead our RequestClient will connect directly to the queue to read.

So… open up RequestClientModule.cs, and change this line:

// Old queue uri
//Uri address = new Uri(ConfigurationManager.AppSettings["ServiceFullUri"]);

// New queue uri
Uri address = new Uri(ConfigurationManager.AppSettings["AzureQueueFullUri"]);

And if you haven’t guessed it, last but not least, go to IocConfig.cs, and change:

// Old registration
//builder.RegisterModule<BusModule>();

// New registration
builder.RegisterModule<AzureServiceBusModule>();


All done. We didn’t touch any of our core code, we just setup the bus, wired it into our IoC and MassTransit handles the rest!

MassTransit Autofac Request and Response

Messages send with MassTransit typically are fire and forget. This is because distributed systems operate in different processes on different machines, giving it the benefit of horizontal scaling (with trade offs, but that’s another discussion entirely). However, the need may arise to use request + response in a distributed system. So this tutorial will show how this can be achieved with MassTransit.

If you have followed some of my other tutorials, you will know that I like to separate the RabbitMQ config with a virtual host and username specific to the tutorial. My config for this tutorial is:

<add key="RabbitMQHost" value="rabbitmq://localhost/tutorial-req-resp" />
<add key="RabbitMQUsername" value="tutorial-req-resp" />
<add key="RabbitMQPassword" value="apple" />

This tutorial will simply show the main components required to set up a Request/Response with MassTransit. You can follow along with the completed project here.

*Update*: When I had drafted this, the MassTransit Documentation didn’t have an example for Request/Response. Now there is excellent documentation here. So I will reduce the scope of this tutorial to registering the IRequestClient<…> in an Ioc Framework (Autofac).

Tutorial

When using Publish + Subscribe, we typically get the IBus or IBusControl injected and use the .Publish or .Send methods to fire and forget. But for Request Response, we will use IRequestClient<…>. Open up RequestClientModule.cs. You will see:

Uri address = new Uri(ConfigurationManager.AppSettings["ServiceFullUri"]);
TimeSpan requestTimeout = TimeSpan.FromSeconds(30);

builder.Register(c => new MessageRequestClient<CheckOrderStatus, OrderStatusResult>(c.Resolve<IBus>(), address, requestTimeout))
    .As<IRequestClient<CheckOrderStatus, OrderStatusResult>>()
    .SingleInstance();

Line 4: This is where our concrete type MessageRequestClient is constructed, which is one of the many value adds for MassTransit. It handles the plumbing of creating a RequestId and correlates messages accordingly.

You might be wondering why I used MessageRequestClient? Because in the official sample, a helper extension method is used instead. If we look at the MassTransit source, we will see the extension is just that, a helper:

public static IRequestClient<TRequest, TResponse> CreateRequestClient<TRequest, TResponse>(this IBus bus, Uri address, TimeSpan timeout,
    TimeSpan? ttl = default(TimeSpan?), Action<SendContext<TRequest>> callback = null)
    where TRequest : class
    where TResponse : class
{
    return new MessageRequestClient<TRequest, TResponse>(bus, address, timeout, ttl, callback);
}

So in our RequestClientModule.cs, you could replace the builder.Register with:

builder.Register(c =>
{
    var bus = c.Resolve<IBus>();

    return bus.CreateRequestClient<CheckOrderStatus, OrderStatusResult>(address, requestTimeout);
})
    .As<IRequestClient<CheckOrderStatus, OrderStatusResult>>()
    .SingleInstance();

Then you would get the exact same behavior. Choose whatever method you prefer.

Now we take a quick peek in the Consumer. Open up CheckOrderStatusConsumer.cs and you will see:

public async Task Consume(ConsumeContext<CheckOrderStatus> context)
{
    Console.Out.WriteLine("Received OrderId: " + context.Message.OrderId);
    context.Respond(new SimpleOrderStatusResult { OrderMessage = string.Format("Echo the OrderId {0}", context.Message.OrderId) });
}

And the important line here is context.Respond(…). This is the other part of the MassTransit value add plumbing. It makes sure that it responds and retains the RequestId. You can actually look and see what the RequestId is with context.RequestId .

There you have it, pretty simple, but powerful features provided by MassTransit ontop of whatever message transport (eg. RabbitMQ, AzureSB) you choose.

Enjoy!

SignalR with Autofac Bootstrapper

We will build off of this example by adding bootstrapping. In this tutorial we will be using Autofac for our IoC, however you can easily follow the majority of the setup, and tweak the bootstrapper dll to use your IoC library of choice.

Tutorial

Step 1 – One change required

The first step is quite easy, follow the introductory tutorial for Signalr. This is very quick, and at the end you will be left with a good starting point to build our horizontally scalable SignalRChat project from.

The tutorial needed one change with the version of jquery:
from this

<script src="~/Scripts/jquery.signalR-2.1.0.min.js"></script>

to this

<script src="~/Scripts/jquery.signalR-2.2.0.min.js"></script>

Step 2 – Update nuget packages

Lets update a few nuget packages in our MVC, just so we make sure we are on the latest stable packages.

Update:

  • Microsoft.AspNet.Mvc
  • Microsoft.AspNet.Razor
  • Microsoft.AspNet.WebPages
  • Microsoft.Owin
  • Microsoft.Owin.Host.SystemWeb
  • Microsoft.Owin.Security

The updated packages below have green checkmarks once complete.

signalrchat_autofac_1

Step 3 – Organize a bit

  1. Create a new folder in the mvc project and name it Hubs
  2. Move ChatHub.cs into this newly created subfolder
  3. Copy and paste the below contents into ChatHub.cs replacing whatever is there now:
    using Microsoft.AspNet.SignalR;
    
    namespace SignalRChat.Hubs
    {
        public class ChatHub : Hub
        {
            public ChatHub(TestClass a)
            {
                var b = a;
            }
            public void Send(string name, string message)
            {
                // Call the addNewMessageToPage method to update clients.
                Clients.All.addNewMessageToPage(name, message);
            }
        }
    
        public class TestClass
        {
            public string Name { get; set; }
        }
    }
    

First, TestClass is only there to allow us to verify that dependency injection is indeed wired up and working.

Step 4 – Make a bootstrapper class library

We will make a new project that will deal with bootstrapping. We can handle all of our dependency registration and setup within this project.

  1. In the MVC project, delete Startup.cs, because we will be moving this functionality to our bootstrapper.
  2. Add a new project to the solution. Make it a C# Class Library. Name it SignalRChat.Web.Bootstrapper
  3. In the new project, rename the default Class1.cs to Startup.cs
  4. Now paste these contents into the file:
    using Autofac;
    using Autofac.Integration.SignalR;
    using Microsoft.AspNet.SignalR;
    using Microsoft.AspNet.SignalR.Hubs;
    using Owin;
    
    namespace SignalRChat.Web.Bootstrapper
    {
        public class Startup
        {
            public void Configuration(IAppBuilder app)
            {
                // Call our IoC static helper method to start the typical Autofac SignalR setup
                var container = IocConfig.RegisterDependencies();
    
                // Get your HubConfiguration. In OWIN, we create one rather than using GlobalHost
                var hubConfig = new HubConfiguration();
    
                // Sets the dependency resolver to be autofac.
                hubConfig.Resolver = new AutofacDependencyResolver(container);
    
                // OWIN SIGNALR SETUP:
    
                // Register the Autofac middleware FIRST, then the standard SignalR middleware.
                app.UseAutofacMiddleware(container);
                app.MapSignalR("/signalr", hubConfig);
            }
        }
    }
    

Now this class file has a few errors because our new bootstrapper project doesn’t have references to these libraries. So we will need to fix these compilation errors and wire up our owin startup. First let’s explain some of the lines here.

var container = IocConfig.RegisterDependencies();

This is a static helper method (which we create in step 5 below), which will register our hubs and any other classes which are necessary.

...
var hubConfig = new HubConfiguration();
...

The rest of the configuration lines have to do with setting the dependency resolver to AutoFac (we aren’t using the built in one provided by .Net Framework anymore) for SignalR and OWIN. The details are all explained nicely here. If you are using a different IoC, this is where you would need to adjust your bootstrapping code appropriately.

Step 5 – IoC setup

  1. Create a new class named IocConfig.cs
  2. Now paste these contents into the file:
    using Autofac;
    using Autofac.Integration.SignalR;
    using SignalRChat.Hubs;
    using System.Reflection;
    
    namespace SignalRChat.Web.Bootstrapper
    {
        public class IocConfig
        {
            public static IContainer RegisterDependencies()
            {
                var builder = new ContainerBuilder();
    
                builder.RegisterType<TestClass>();
    
                // Register your SignalR hubs.
                builder.RegisterHubs(Assembly.Load("SignalRChat.Web"));
    
                return builder.Build();
            }
        }
    }
  3. Right click References > Add References,  and we will add solution references for the MVC project

Now we will install the packages in package manager console with our Default Project: SignalRChat.Web.Bootstrapper

  • install-package microsoft.owin.security -version 3.0.1
  • install-package microsoft.owin.host.systemweb -version 3.0.1
  • install-package microsoft.aspnet.signalr.core -version 2.2.0
  • install-package autofac.owin
  • install-package autofac.signalr

Important note #1: You’ll notice after running all of those nuget commands, the project now has an app.config file. You’ll notice it has some entries for runtime binding redirect, which is needed because signalr.core references older versions. But luckily, Web.config already references these binding redirects, and fortunately the .config file for the executing assembly takes precedence over all others. So in this case, the Web.Config is used, and it already has these exact same runtime binding redirects (plus several others). So you can safely delete app.config if you like, or leave it.

Important note #2: You might also notice that we specified the versions of the nuget packages as well. I made sure these versions matched the versions in our MVC packages.config. signalrchat_autofac_4 We did this because we want to make sure that the version we reference in our SignalRChat.Web.Bootstrapper is the same as the version in the MVC project. A good practice to employ is make your versions match in different projects, because when you bootstrap everything at runtime, there’s less chance to get errors because of incompatible versions.

You will notice that we didn’t bother to include versions for the autofac dependencies. This is because we don’t have autofac as a reference in any other projects in the solution, so I’m not concerned with trying to make the versions match.

We are almost there!

Step 6 – Final settings

Because we are bootstrapping, we want to make sure our assemblies all build to the same /bin folder. This will be the <MVC project dir>/bin. So we will go into the Bootstrapper projects, and edit their build properties to have an output path of: ..\SignalRChat\bin\ for Debug and Release configurations

signalrchat_autofac_6

And the one last step, open the MVC project’s Web.config and add the following in the <appSettings> section

<add key="owin:AppStartup" value="SignalRChat.Web.Bootstrapper.Startup, SignalRChat.Web.Bootstrapper" />

Done!

Now you can run the project, go to the ~/home/chat and it will function as it did before, but we are using IoC with Autofac.

The final solution can be found on github here.

Please check back for another tutorial that builds off of this. We will look at using MassTransit to pass our chat messages around to help the chat application become horizontally scalable.