MassTransit with Docker on Azure

This tutorial will explain how to containerize a MassTransit service. You should have some familiarity with:

  • MassTransit services using TopShelf
  • Message Queue (RabbitMQ or Azure Service Bus)
  • Basic Docker understanding (although you could be a complete beginner)
  • Azure experience (you don’t need to be an expert, but should be familiar with portal.azure.com)

What we plan to accomplish:

  • Extend a MassTransit Topshelf (full .NET framework) service to build a docker image
  • Publish the docker image to a Azure Container Registry
  • Run the image in an Azure Container Instance

Background

While MassTransit support for .NET Standard is fast approaching, some businesses might have MassTransit consumers build which still have dependencies on .NET Framework. But that doesn’t mean we need to stick to deploying our MassTransit services to VM’s and install them as Windows Services. Deploying containers has so many benefits, it makes sense to convert current top shelf services into containers whenever possible.

So I’m assuming you already have a MassTransit service that is deployed using windows services (using TopShelf). If you don’t but wish to follow along with this tutorial, you can use the starter kit service.

Build Docker Image

First off, you need to install Docker for Windows. Once this is done, you will have a system tray icon. You will need to right click on this and choose “Switch to Windows Containers”. This may require your computer to reboot.

Dockerfile

Everything in this dockerfile is taken from the microsoft sample.

FROM:

When you want to create your docker image, you usually specify a base image in which you will build your image ontop of. Because we need .NET Framework, we base our image off of microsoft/dotnet-framework:4.6.2 .

FROM microsoft/dotnet-framework:4.6.2

NOTE: If we were using .NET Standard/Core, we would use a different more lightweight image from microsoft/* (which I will cover in a future post).

WORKDIR:

Specifies the working directory. It’s a good habit to set an appropriate working directory before copying your bin directory.

WORKDIR /app

COPY:

Copies the files from a path relative to the dockerfile’s location, into the image you are building. Since the pwd is now /app, this would copy all files in the bin directory into /app/*

COPY StarterKit.Service/bin/Release/net461 .

ENTRYPOINT:

Pretty simple, allows the container to be configured to run as an executable. This is pretty important, because we need to start our MassTransit Topshelf console application.

ENTRYPOINT ["StarterKit.Service.exe"]

Once you have everything setup in the docker file, make sure you save it. Then in cmd (or powershell which is the default now), run the command

docker build -t starterkit-masstransit .

This will build, with the dockerfile in the current directory (make sure your current directory in powershell is at the same level as the dockerfile, and also make sure that the path you specified in the dockerfile COPY is in the same relation to the current directory. This is all important for a successful image.

Now if you run this container, you can see that it will start listening, just as a topshelf service will when executed as a console app.

docker run --name mystarterkit --rm starterkit-masstransit

The –rm will make sure the container is deleted after it exits. I also suggest you look at the difference between docker run and docker start.

NOTE: To stop the container, open another powershell and execute…

docker stop --time 10 mystarterkit

Now before we can deploy this container to Azure, we must extract out any environment specific settings.

Extend MassTransit Service

A few things that will need to be done before we can containerize your service are as follows:

  1. If you log to a windows event log, or flat file log, I recommend logging to a central location. When you start to build up infrastructure that can be scaled out and in based on demand, it becomes cumbersome to continue logging to flat files. However you could still log to a file location and your Docker Container could mount a virtual drive, which could persist through construction/destruction. This tutorial will assume you use a central logging mechanism (e.g. Seq, SqlDb, NonRelationalDb, etc…). The sample provided uses Azure CosmoDb for central logging.
  2. Identify environment specific settings, because the whole benefit of Continuous Integration and Continuous Delivery is the ability to deploy the same artifact/package to each environment with minimal (if any) changes.

Centralize Logging

This is already done with our sample service. If you are following this tutorial for your own service, I’m going to leave this as a choice for the reader.

Environment Specific Settings

Without getting into the nitty gritty for preferences on build artifacts and environment settings, there are some options we have for providing environment specific settings (I’m mainly talking about connection strings,auth keys, etc…)

  1. You use mechanisms to tweak/replace specifc app settings at deploy time (WebDeploy, xml transforms, etc…).
  2. You use more enterprise level mechanism (e.g. etcd, consul…), and fetch these settings at startup/runtime.
  3. Neither of the above, maybe make a package/artifact for each environment at build time.

I don’t want to get into the opinions about what school of thought is the best, because developers can be quite opinionated. Instead I will mention the mechanism you could use with docker, depending on which one you current CI workflow falls under.

  1. Docker –env or –env-list. Basically set environment variables within the docker at container creation time, then we can easily pass in our environment specific values for each environment.
  2. No change at all (…kinda)! You will likely still need to securely connect to your distributed key/value store, but this can be accomplished different ways, and is a combo of dev and devops. I won’t go into the specifics, because it can vary depending on your setup.
  3. You would probably create a dockerfile per environment, similar to creating a package per environment.

For the purposes of this tutorial we will be using Option 1 (environment variables).

So in our sample solution, we have quite a few app settings, but we have identified the two that need to change per environment. So we go into our boostrapping code and read from the environment variable name instead of the Configuration Manager’s AppSettings. We’ve done this in our AzureServiceBusBusFactory.cs and TopshelfSerilogBootstrapper.cs.

In the sample project, we’ve pulled these two settings out into environment variables named AzureSbConnectionString and CosmoDbAuthKey . So we will have to make sure we provide these as environment variables. We will remember this for later.

Don’t forget to rebuild in Release configuration, and then perform a docker build again, with these changes.

Add –env flag for Docker Run

Now add the environment variables to the docker run command

docker run --name mystarterkit --rm --env AzureSbConnectionString=<sbconnectionstring> --env CosmoDbAuthKey=<myauthkey> starterkit-masstransit

And it will run the service, the same as before, but instead it is getting the environment specific values from the environment variables.

Azure Container Registry

Now we have an image ready to publish to our azure container registry. Before we can publish, we need to create this registry in azure (if we don’t already have one).

  1. In your azure portal, add an “Azure Container Registry”, with these settings:
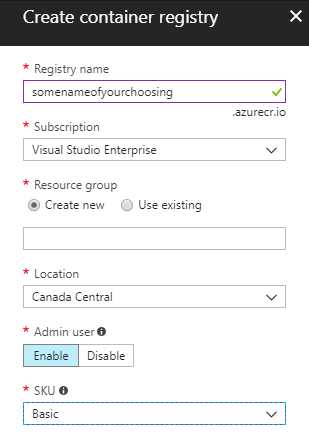
  2. Once the resource is done initializing, browse to the container registry in the list of resources, and click on the “Access Keys”. Copy password or password2. It doesn’t matter which one.
  3. In powershell on your local computer, enter
    docker login <yourregistryname>.azurecr.io

    with username: <yourregistryname>
    password: <paste the password or password2>

  4. Tag the image with the container registry name (I added :v1.0.0 for the additional tag of the version, you can leave this off if you like).
    docker tag mystarterkit <yourregistryname>.azurecr.io/starterkit-masstransit:v1.0.0
  5. Push the image now to the registry.
    docker push <yourregistryname>.azurecr.io/starterkit-masstransit

    This might take some time to upload (Mine was about ~980MB). This should be much faster when using .NET Standard with Masstransit V4, because of the reduced image size. But for now, this is what we have to work with.

Azure Container Instances

The hard part is over. We’ve made our image, and uploaded it to our private docker registry. All we need to do now is create a container instance (in a resource group), and pass in our environment variables.

  1. First, this is easier with Azure CLI (and I don’t see how you can pass environment variables within Azure Portal), so please download the latest version of Azure CLI and install it. Once done, give az access to your account access with az login .
  2. Azure Container Instances requires an empty resource group, so run this command to create one.
    az group create --name mystarterkit --location eastus
  3. Now this is the large command, where it creates the container instance with all the parameters.
    az container create --name starterkit-masstransit --image <yourregistryname>.azurecr.io/starterkit-masstransit:v1.0.0 --cpu 1 --memory 1 --os-type Windows --registry-password <passowrd or password2> --environment-variables "AzureSbConnectionString=<putinconnectionstring>" "CosmoDbAuthKey=<putinauthkey>" --resource-group mystarterkit
  4. Now it might take a bit of time to start, but once it does you can view that it has a running state in Azure Portal.
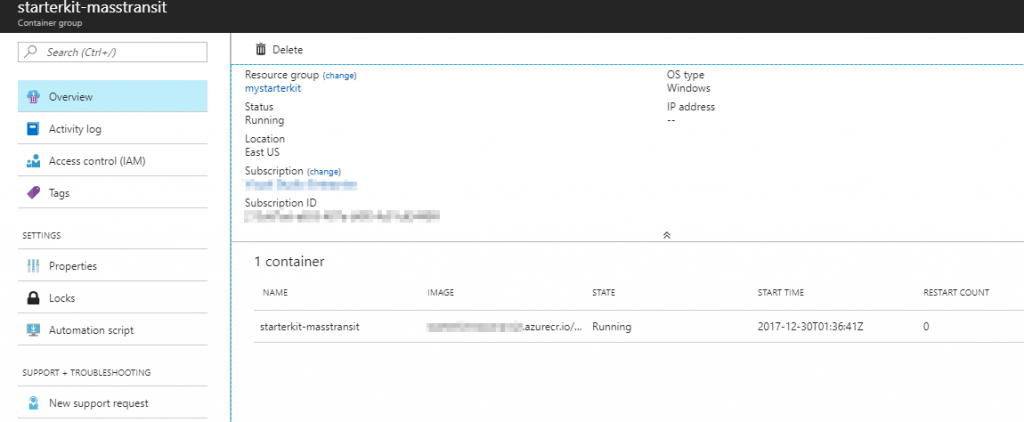
  5. You can also view the console logs with this command:
    az container logs --name starterkit-masstransit -g mystarterkit

    And lastly, to verify the service can receive messages, we will publish a message to the bus with our local solution, and then view the logs.


So you will notice that because console logging uses a Message Formatter, which defaults to [{Timestamp:HH:mm:ss} {Level:u3}] {Message:lj}{NewLine}{Exception} we miss some data that is captured with our Serilog Audit Logger. This is captured with the CosmoDb logs. I really like it’s ability to destructure the objects when logging. So here’s what those last three console logging lines look like from Cosmo Db.

(1)

{
  "EventIdHash": 3786104064,
  "Timestamp": "2017-12-30 02:01:49.869+00:00",
  "Level": "Debug",
  "Message": "Logged Message Metadata.",
  "MessageTemplate": "Logged Message Metadata.",
  "Exception": null,
  "Properties": {
    "MessageMetadata": {
      "MessageId": "04cb0000-2398-4215-52e0-08d54f294a06",
      "ConversationId": "04cb0000-2398-4215-fcb3-08d54f294a07",
      "CorrelationId": null,
      "InitiatorId": null,
      "RequestId": null,
      "SourceAddress": "sb://<yourservicebus>.servicebus.windows.net/DESKTOP4V7PB3H_testhostx86_bus_yufoyybdubbbm9w1bdkw6kkbb1?express=true&autodelete=300",
      "DestinationAddress": "sb://<yourservicebus>.servicebus.windows.net/StarterKit.Contracts/DoSomeWork",
      "ResponseAddress": null,
      "FaultAddress": null,
      "ContextType": "Consume",
      "Headers": {},
      "Custom": null
    },
    "SourceContext": "StarterKit.Service.Middlewares.SerilogMessageAuditStore",
    "EnvironmentUserName": "User Manager\\ContainerAdministrator",
    "MachineName": "2005C6CF48DA"
  },
  "ttl": 86400,
  "id": "1b468300-bf37-5409-6333-7a22a8e84c63"
}

(2)

{
  "EventIdHash": 2934481351,
  "Timestamp": "2017-12-30 02:01:49.871+00:00",
  "Level": "Debug",
  "Message": "Logged Message Payload.",
  "MessageTemplate": "Logged Message Payload.",
  "Exception": null,
  "Properties": {
    "MessagePayload": {
      "Data1": "Second Bit of Data",
      "Data2": 87,
      "Data3": [
        "Apple",
        "Pear",
        "Orange"
      ]
    },
    "SourceContext": "StarterKit.Service.Middlewares.SerilogMessageAuditStore",
    "EnvironmentUserName": "User Manager\\ContainerAdministrator",
    "MachineName": "2005C6CF48DA"
  },
  "ttl": 86400,
  "id": "7741c88b-5599-b07a-bf46-896448d521ce"
}

(3)

{
  "EventIdHash": 1752422595,
  "Timestamp": "2017-12-30 02:01:49.914+00:00",
  "Level": "Information",
  "Message": "Doing Work with Data1: 'Second Bit of Data'",
  "MessageTemplate": "Doing Work with Data1: 'Second Bit of Data'",
  "Exception": null,
  "Properties": {
    "SourceContext": "StarterKit.Module.Consumers.DoSomeWorkConsumer",
    "EnvironmentUserName": "User Manager\\ContainerAdministrator",
    "MachineName": "2005C6CF48DA"
  },
  "ttl": 86400,
  "id": "5dadf589-e25f-e202-6116-e6b69dfa9dba"
}

Wrapping Up

As you can see, there’s a lot of benefit to containerization, and adding this to your CI/CD workflow is pretty straightforward. You will want to make sure to take more careful care with Versioning/Tags when creating images. It takes a bit of time to wrap your head around docker images, containers, repositories, tags, etc… There are many explanations available to help understand them, just use your favorite search engine and you should find some in no time.

Here’s some links I found Useful when creating this tutorial:
MassTransit with Azure Service Bus

One of the great features of MassTransit is the abstraction it provides over the message transport. This allows you to forget about the plumbing and focus on distributed application design and development.

Now would be a great opportunity to take one of our past tutorials and convert it from RabbitMQ to Azure Service Bus. It will become very clear how easily you can switch from one message transport to another. The completed project for this tutorial can be found here under the azure-service-bus branch.

Tutorial

First, clone the master branch from this tutorial. Don’t worry if you don’t have RabbitMQ setup locally, because we will be switching the solution to use Azure Service Bus.

Create an Azure Service Bus

The first thing we need to do is create an AzureSB for this project. You can use a free trial, or if you have an MSDN License that works too. You’ll want to log into https://portal.azure.com. Once at the dashboard screen, follow these steps:

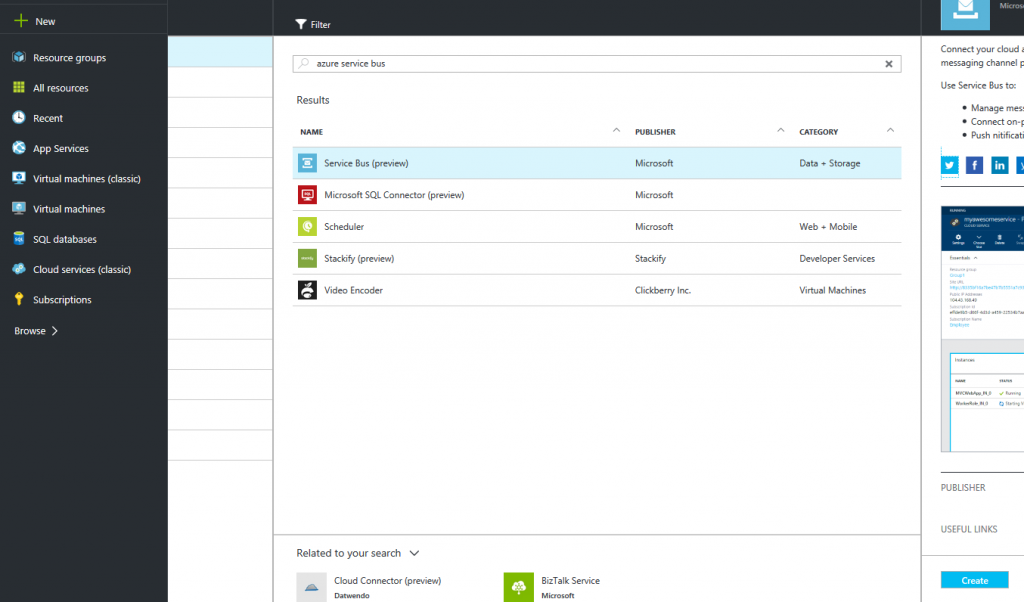
  1. Click New, and search for “azure service bus” or “service bus”. Then select it, and click “Create”.
    tutorial-req-resp_azure_1
  2. Within the Create window, you will want to enter settings:
    Name: <this will be your namespace>
    Pricing Tier: <Must be Standard or higher, MassTransit needs Topics and Queues>
    Resource group: <I made a new one, but you can choose existing if you have one>
    tutorial-req-resp_azure_2
  3. Wait a bit while it creates/deploys the Service Bus
    tutorial-req-resp_azure_3
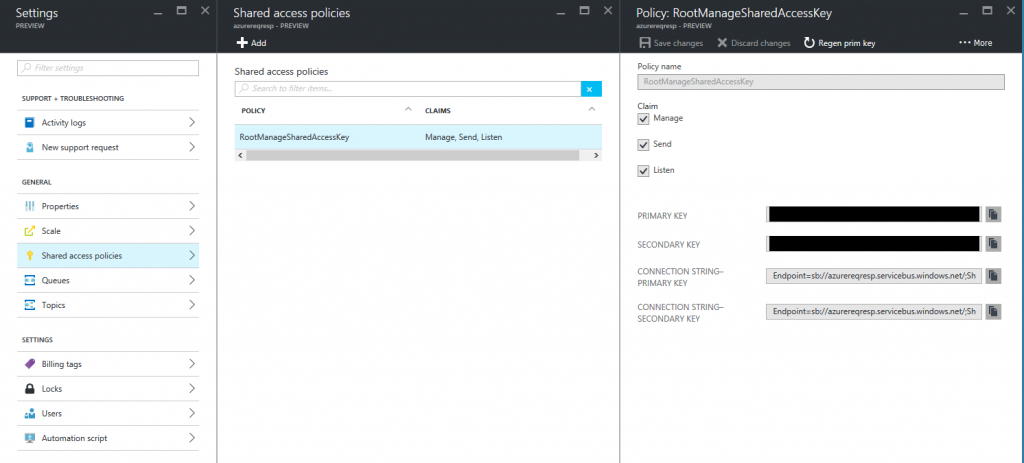
  4. Once Created, you will want to click “Shared access policies”, Choose “RootManageSharedAccessKey” and then leave this window open, because we will need to copy the primary key values into our App.config and Web.config.

Update the Project Configs

Before we update our project IoC with the Azure SB transport, we need to add the Azure Key Name and Shared Access Key for the Service Bus we made in the previous section.

  1. Open your App.config in the StarterKit.Service project. Add the 4 lines with Azure configuration as follows:
    <appSettings>
      <add key="AzureSbNamespace" value="azurereqresp" />
      <add key="AzureSbPath" value="TutorialReqResp" />
      <add key="AzureSbKeyName" value="RootManageSharedAccessKey" />
      <add key="AzureSbSharedAccessKey" value="+yourlongkeyhere=" />
      <add key="RabbitMQHost" value="rabbitmq://localhost/tutorial-req-resp" />
      <add key="RabbitMQUsername" value="tutorial-req-resp" />
      <add key="RabbitMQPassword" value="apple" />
      <add key="ServiceQueueName" value="order_status_check" />
    </appSettings>

    Line 2: This must match the namespace you used when creating the Azure Service Bus
    Line 3: This can be a path of your choosing, similar to RabbitMQ’s virtual host. A logical separation for different topics and queues within the same namespace
    Line 4: Leave this as is
    Line 5: Paste in your shared access key (continue reading to see how you obtain the Shared Access Key)

  2. Open your Service Bus in Azure Portal. Then click Settings -> Shared access policies -> Root manage shared access key. You can copy the Primary key (or secondary, it doesn’t matter) and paste it into your App.config.
    tutorial-req-resp_azure_4
  3. Now open Web.config in StarterKit.Web and add the same 4 lines, plus a new 5th line.
    <appSettings>
      <add key="AzureSbNamespace" value="azurereqresp" />
      <add key="AzureSbPath" value="TutorialReqResp" />
      <add key="AzureSbKeyName" value="RootManageSharedAccessKey" />
      <add key="AzureSbSharedAccessKey" value="+yourlongkeyhere=" />
      <add key="AzureQueueFullUri" value="sb://azurereqresp.servicebus.windows.net/tutorialreqresp/order_status_check/" />
      <add key="RabbitMQHost" value="rabbitmq://localhost/tutorial-req-resp" />
      <add key="RabbitMQUsername" value="tutorial-req-resp" />
      <add key="RabbitMQPassword" value="apple" />
      <add key="ServiceFullUri" value="rabbitmq://localhost/tutorial-req-resp/order_status_check" />
      <add key="webpages:Version" value="3.0.0.0" />
      <add key="webpages:Enabled" value="false" />
      <add key="ClientValidationEnabled" value="true" />
      <add key="UnobtrusiveJavaScriptEnabled" value="true" />
      <add key="owin:AppStartup" value="StarterKit.Web.Bootstrapper.Startup, StarterKit.Web.Bootstrapper" />
    </appSettings>

    Line 6: This should look familiar if you followed the original req-resp tutorial here. Because the RequestClient needs to connect to a specific endpoint (queue), we need to provide the full Uri that we can access the queue in Azure. The uri of queues can be determined fairly easily, here’s a quick explanation: sb://<namespace>.servicebus.windows.net/<path>/<queue_name>

Add MassTransit Azure Packages and Register with our Container

Great. Now we have our configuration settings saved and ready to use. Now all we have to do it change the container we register in our IoC of both the StarterKit.Service and StarterKit.Web projects. We don’t need to change a single line of business logic code in our app. Thank you MassTransit!

First, you will need to install the nuget package MassTransit.AzureServiceBus in both the StarterKit.Service and StarterKit.Web.Bootstrapper.

StarterKit.Service Changes

Once complete, create a new file in StarterKit.Service/Modules named AzureServiceBusModule.cs.

Paste the following in the file.

public class AzureServiceBusModule : Module
{
    private readonly System.Reflection.Assembly[] _assembliesToScan;

    public AzureServiceBusModule(params System.Reflection.Assembly[] assembliesToScan)
    {
        _assembliesToScan = assembliesToScan;
    }

    protected override void Load(ContainerBuilder builder)
    {
        // Creates our bus from the factory and registers it as a singleton against two interfaces
        builder.Register(c => Bus.Factory.CreateUsingAzureServiceBus(sbc =>
        {
            var serviceUri = ServiceBusEnvironment.CreateServiceUri("sb", ConfigurationManager.AppSettings["AzureSbNamespace"], ConfigurationManager.AppSettings["AzureSbPath"]);

            var host = sbc.Host(serviceUri, h =>
            {
                h.TokenProvider = TokenProvider.CreateSharedAccessSignatureTokenProvider(ConfigurationManager.AppSettings["AzureSbKeyName"], ConfigurationManager.AppSettings["AzureSbSharedAccessKey"], TimeSpan.FromDays(1), TokenScope.Namespace);
            });

            sbc.ReceiveEndpoint(host, ConfigurationManager.AppSettings["ServiceQueueName"], e =>
            {
                // Configure your consumer(s)
                e.Consumer<CheckOrderStatusConsumer>();
                e.DefaultMessageTimeToLive = TimeSpan.FromMinutes(1);
                e.EnableDeadLetteringOnMessageExpiration = false;
            });
        }))
            .SingleInstance()
            .As<IBusControl>()
            .As<IBus>();
    }
}

Line 15: This helper method from Microsoft.ServiceBus namespace lets us construct our service Uri. You will notice that this uri is the same as our queue in the previous section, sans /<queue_name>.
Line 19: This also uses a helper method to create the Token Provider for us, providing all the proper pieces of information.

Last but not least, head over to IocConfig.cs and change the line:

// Old Registration
//builder.RegisterModule(new BusModule(Assembly.GetExecutingAssembly()));

// New Registration
builder.RegisterModule(new AzureServiceBusModule(Assembly.GetExecutingAssembly()));

Done!

StarterKit.Web.Bootstrapper

Almost there. I guess you can probably imagine we now need to create a new file at StarterKit.Web.Bootstrapper/Modules/AzureServiceBusModule.cs. Paste in the following:

public class AzureServiceBusModule : Module
{
    protected override void Load(ContainerBuilder builder)
    {
        // Creates our bus from the factory and registers it as a singleton against two interfaces
        builder.Register(c => Bus.Factory.CreateUsingAzureServiceBus(sbc =>
        {
            var serviceUri = ServiceBusEnvironment.CreateServiceUri("sb", ConfigurationManager.AppSettings["AzureSbNamespace"], ConfigurationManager.AppSettings["AzureSbPath"]);

            var host = sbc.Host(serviceUri, h =>
            {
                h.TokenProvider = TokenProvider.CreateSharedAccessSignatureTokenProvider(ConfigurationManager.AppSettings["AzureSbKeyName"], ConfigurationManager.AppSettings["AzureSbSharedAccessKey"], TimeSpan.FromDays(1), TokenScope.Namespace);
            });
        }))
            .SingleInstance()
            .As<IBusControl>()
            .As<IBus>();
    }
}

Again, same as previous, but we obviously don’t need to create the endpoint here. Instead our RequestClient will connect directly to the queue to read.

So… open up RequestClientModule.cs, and change this line:

// Old queue uri
//Uri address = new Uri(ConfigurationManager.AppSettings["ServiceFullUri"]);

// New queue uri
Uri address = new Uri(ConfigurationManager.AppSettings["AzureQueueFullUri"]);

And if you haven’t guessed it, last but not least, go to IocConfig.cs, and change:

// Old registration
//builder.RegisterModule<BusModule>();

// New registration
builder.RegisterModule<AzureServiceBusModule>();


All done. We didn’t touch any of our core code, we just setup the bus, wired it into our IoC and MassTransit handles the rest!

MassTransit Autofac Request and Response

Messages send with MassTransit typically are fire and forget. This is because distributed systems operate in different processes on different machines, giving it the benefit of horizontal scaling (with trade offs, but that’s another discussion entirely). However, the need may arise to use request + response in a distributed system. So this tutorial will show how this can be achieved with MassTransit.

If you have followed some of my other tutorials, you will know that I like to separate the RabbitMQ config with a virtual host and username specific to the tutorial. My config for this tutorial is:

<add key="RabbitMQHost" value="rabbitmq://localhost/tutorial-req-resp" />
<add key="RabbitMQUsername" value="tutorial-req-resp" />
<add key="RabbitMQPassword" value="apple" />

This tutorial will simply show the main components required to set up a Request/Response with MassTransit. You can follow along with the completed project here.

*Update*: When I had drafted this, the MassTransit Documentation didn’t have an example for Request/Response. Now there is excellent documentation here. So I will reduce the scope of this tutorial to registering the IRequestClient<…> in an Ioc Framework (Autofac).

Tutorial

When using Publish + Subscribe, we typically get the IBus or IBusControl injected and use the .Publish or .Send methods to fire and forget. But for Request Response, we will use IRequestClient<…>. Open up RequestClientModule.cs. You will see:

Uri address = new Uri(ConfigurationManager.AppSettings["ServiceFullUri"]);
TimeSpan requestTimeout = TimeSpan.FromSeconds(30);

builder.Register(c => new MessageRequestClient<CheckOrderStatus, OrderStatusResult>(c.Resolve<IBus>(), address, requestTimeout))
    .As<IRequestClient<CheckOrderStatus, OrderStatusResult>>()
    .SingleInstance();

Line 4: This is where our concrete type MessageRequestClient is constructed, which is one of the many value adds for MassTransit. It handles the plumbing of creating a RequestId and correlates messages accordingly.

You might be wondering why I used MessageRequestClient? Because in the official sample, a helper extension method is used instead. If we look at the MassTransit source, we will see the extension is just that, a helper:

public static IRequestClient<TRequest, TResponse> CreateRequestClient<TRequest, TResponse>(this IBus bus, Uri address, TimeSpan timeout,
    TimeSpan? ttl = default(TimeSpan?), Action<SendContext<TRequest>> callback = null)
    where TRequest : class
    where TResponse : class
{
    return new MessageRequestClient<TRequest, TResponse>(bus, address, timeout, ttl, callback);
}

So in our RequestClientModule.cs, you could replace the builder.Register with:

builder.Register(c =>
{
    var bus = c.Resolve<IBus>();

    return bus.CreateRequestClient<CheckOrderStatus, OrderStatusResult>(address, requestTimeout);
})
    .As<IRequestClient<CheckOrderStatus, OrderStatusResult>>()
    .SingleInstance();

Then you would get the exact same behavior. Choose whatever method you prefer.

Now we take a quick peek in the Consumer. Open up CheckOrderStatusConsumer.cs and you will see:

public async Task Consume(ConsumeContext<CheckOrderStatus> context)
{
    Console.Out.WriteLine("Received OrderId: " + context.Message.OrderId);
    context.Respond(new SimpleOrderStatusResult { OrderMessage = string.Format("Echo the OrderId {0}", context.Message.OrderId) });
}

And the important line here is context.Respond(…). This is the other part of the MassTransit value add plumbing. It makes sure that it responds and retains the RequestId. You can actually look and see what the RequestId is with context.RequestId .

There you have it, pretty simple, but powerful features provided by MassTransit ontop of whatever message transport (eg. RabbitMQ, AzureSB) you choose.

Enjoy!

MassTransit Send vs. Publish

MassTransit is capable of a lot, and one important feature is Send vs Publish. If you read the official documentation section “creating a contract“, it talks about commands (send) and events (publish). This makes sense, because commands you want to only be executed once, however events can be observed by one or more listeners.

This tutorial will look at what is happening with the two different message types. To follow along, download the completed project here. The only thing you will need to do is create a virtual host and user in RabbitMQ. Other tutorials for MassTransit typically use the default RabbitMQ guest/guest account, but I prefer to separate mine into virtual hosts. So open the solution and look in either of the three services App.config or the Mvc Web.config. You’ll see:

<add key="RabbitMQHost" value="rabbitmq://localhost/tutorial-send-vs-publish" />
<add key="RabbitMQHostUsername" value="tutorial-send-vs-publish" />
<add key="RabbitMQHostPassword" value="chooseapassword" />

So browse to http://localhost:15672, login as admin and configure. I make the virtual host and username the same. Then choose a password you want. After it’s setup run the solution and try it out!

Tutorial

I started with the Mvc StarterKit and created 3 services. One service is for the events (in practice it could be 1..n). The other two services for commands have artificially fast and slow processing speeds. This was done to illustrate that although X quantity of commands are queued, they are only processed once (well, once or more to be honest, as RabbitMQ is a ‘at least once’ message broker).

Note #1: Commands and events are both usually defined as interfaces. Therefore using descriptive names helps discern commands from events.

Publish (Events)

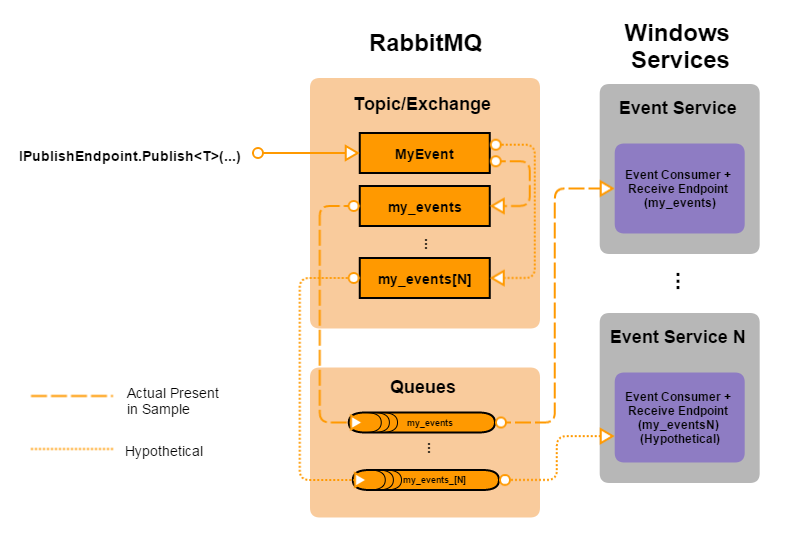
Lets use a post office and mailbox to help describe publish. An event in MassTransit is akin to flyer’s that we receive in the mail. They aren’t directly addressed to us, but everybody who has a mailbox gets them. So flyer = event, and mailbox = endpoint. When building your bus and registering an endpoint like so: sbc.ReceiveEndpoint(…), one has to be sure that the queueName parameter is unique. This is emphasized in the “common gotcha’s” part of the documentation. Now although it’s called queueName, it actually makes an Exchange and Queue pair, both named after the queueName parameter.

The below diagram shows the MyEvent flow in the sample project.

send-vs-publish_2r2

Although the sample doesn’t have multiple event services, I added my_events[N] just to show you each new service (and receive endpoint) will have a corresponding exchange+queue pair made.

Note #2: Now when I’ve used MassTransit and RabbitMQ, I’ve never worked with high traffic projects that result with queue or service bottlenecks. I believe RabbitMQ can be thrown quite a lot and keep up, but if you are encountering thresholds for RabbitMQ or the service, then you will need to think about RabbitMQ clustering, or adding more services (perhaps even scaling out services). But these are highly specialized and more advanced topics. My advice would be to use the MassTransit and RabbitMQ community discussion boards or mailing lists.

Send (Commands)

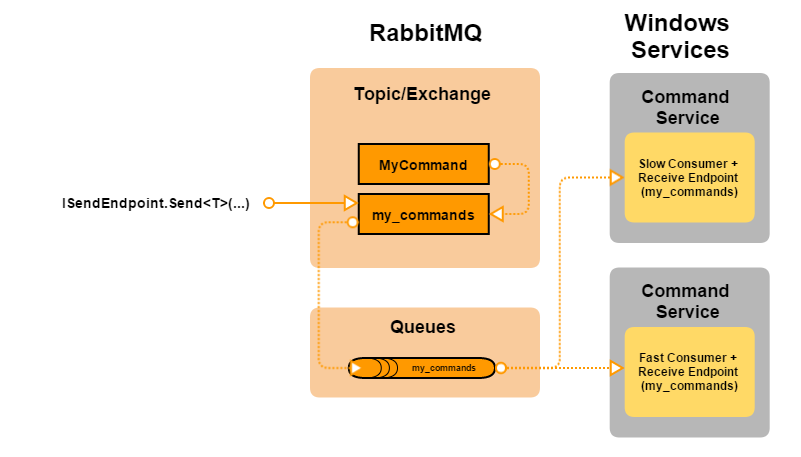
Commands should only be executed once (although you should be aware if making commands idempotent, but we will not cover this more complex topic in this tutorial). So in our scenario above (publish), if we have multiple services (ie. multiple endpoints) for the same contract type, we will have a single command being executed by many consumers. So rather than publish, we send a command to a specific queue+exchange pair. Then, our services can connect to the same receive endpoint’s queueName so long as they have the same consumers registered. I’m paraphrasing this important point from the documentation.

Here’s the MyCommand flow in the sample project.

send-vs-publish_2

The one main difference is the Message is sent directly to the my_commands endpoint exchange, rather than the MyCommand contract exchange. This avoids the contract exchange fan-out. In the sample, we also chose our services to subscribe to the same endpoint (as I made sure they both had the same consumers registered). I cheated a little and added a different sleep time to each consumer.

Code Comparison

To publish:

await _bus.Publish<MyEvent>(...);

Pretty simple, nothing to explain here

To send:

var sendEndpoint = await _bus.GetSendEndpoint(new Uri(ConfigurationManager.AppSettings["MyCommandQueueFullUri"]));
await sendEndpoint.Send<MyCommand>(...);

The big difference, we have to get our send endpoint first by passing in the Full Uri.

I hope this has helped clarify commands vs events, and when to use each. The next post I have planned will look at Transient vs Persistent exchanges+queues.