A few weeks ago, Chris published a Sample-ShoppingWeb with a supporting blog post (a good foundation to understand the Sample), which showcases how to implement a expiring shopping carts, complete with a Saga and Quartz Scheduler. This sample code really starts to show the power of MassTransit, going beyond simple PubSub and ReqResp functionality. However I like to know how things work, and visualizing the flow really helps me understand what’s going on under the covers. So please read on if you are curious as well!
First, try it yourself
Download the Sample-ShoppingWeb and run it on your machine. Make sure you either have a guest/guest account in RabbitMQ, or quickly setup a virtual host in RabbitMQ web console (similar to how I did in Step 2 here) for the shopping cart.
Once you have your solution up and running, you can see how adding fake items to a users cart will start the expiration countdown (and adding more items will refresh it). If the countdown elapses, the cart is destroyed. A lot is going on here, but I will try to break it down in steps.
Exchanges/Queues
After you have run the sample, you will notice in the RabbitMQ web console there are these exchanges:
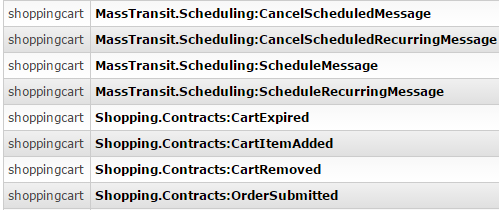
The first 4 are created by our Scheduler, the second 4 are created by the Saga. Each of these 4 exchanges can be viewed as two groupings. If you look in the TrackingServices.cs at this code snip:
...
x.ReceiveEndpoint(host, "shopping_cart_state", e =>
{
    e.PrefetchCount = 8;
    e.StateMachineSaga(_machine, _repository.Value);
});

x.ReceiveEndpoint(host, ConfigurationManager.AppSettings["SchedulerQueueName"], e =>
{
    x.UseMessageScheduler(e.InputAddress);
    e.PrefetchCount = 1;

    e.Consumer(() => new ScheduleMessageConsumer(_scheduler));
    e.Consumer(() => new CancelScheduledMessageConsumer(_scheduler));
});
...
You’ll see that two receive endpoints are made, and if you look at the Queues in the RabbitMQ web console, you’ll see sample_quartz-scheduler and shopping_cart_state. So each of the grouping of 4 Exchanges will send all messages to their respective queue.
Flow Diagram
The example of clicking the “Add Item” button once on the Cart webpage is as follows:
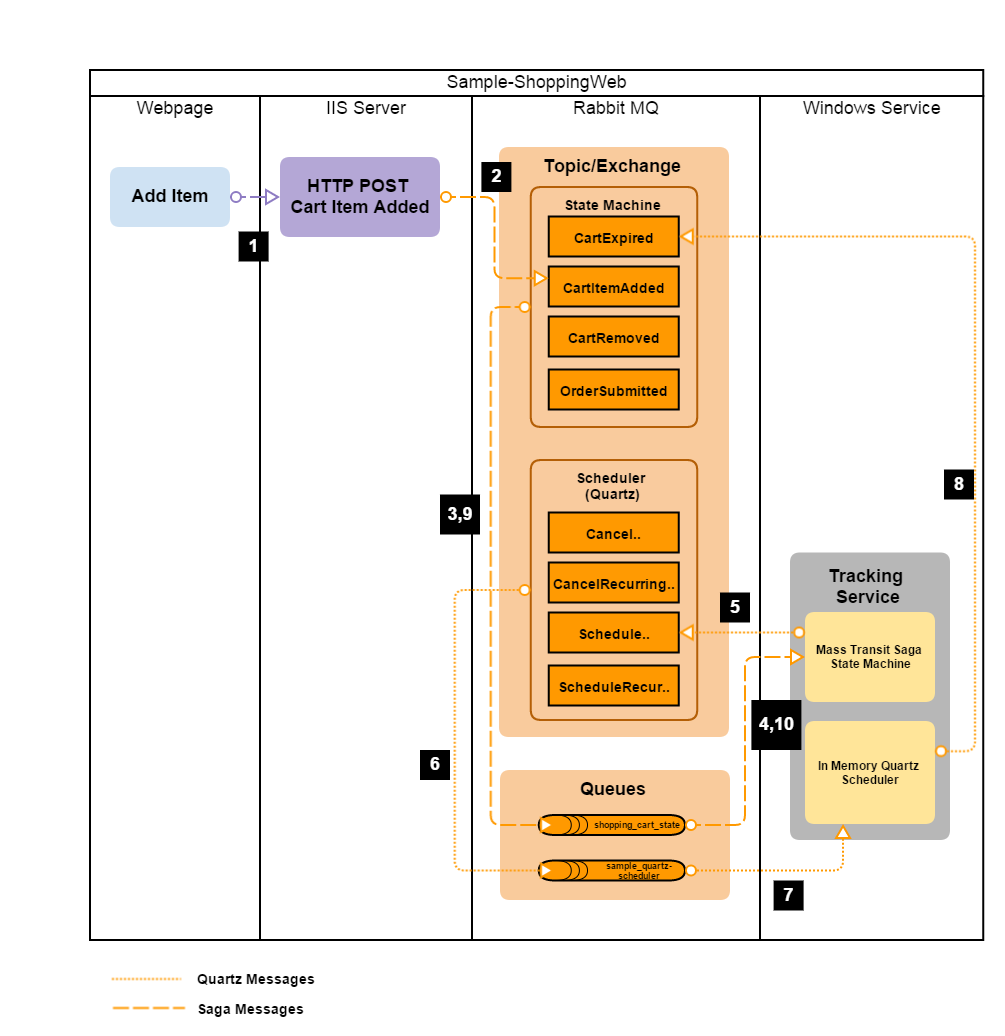
Okay, so there’s a lot going on here, so I’ll break it down into the numbered steps shown in the picture.
- The webpage performs a Form submit (using HTTP POST). The input field is meant to hold the username (a unique identifier for the cart). Any one username can only have one active cart at a time.
- The MVC controller receives this HTTP POST message, and creates a message CartItemAdded and publishes it to the Service Bus (RabbitMQ).
- The message is received in the appropriate exchange, and then sent to the queue shopping_cart_state.
The TrackingService is running in a TopShelf service, and is listening with consumers on each queue. One group of consumers (handled by the Saga Repository) is listening to the saga queue, the other grouping (handled by the Quartz Scheduler) listens to the scheduler queue. - The saga state machine sees the CartItemAdded and starts a new state machine. This state is saved to the local database using Entity Framework.
- A schedule message is kicked off from the state machine for 10 seconds into the future.
- The schedule message is passed along to the sample_quartz-scheduler.
- The in memory scheduler receives the message and will take actions when the schedule message indicated. (Quartz has the capability to run with a persistent mechanism, because if the TrackingService crashed before the 10 seconds was triggered, the cart would not be expired).
- The 10 second mark has passed, and the scheduler sends a CartExpired message.
- The message is passed to the saga queue from the exchange.
- The Tracking Service gets the CartExpired message, and it first looks in the DB to see if a state instance already exists (using the CorrelationId). It finds the saved state, loads it, and then raises the CartExpired event to follow the State Machine flow. This event ends the state machine and deletes it’s entry from the database, because the state machine has set SetCompletedWhenFinalized(); .
Now as you can see, quite a lot happened after you pressed that “Add Item” button. So hopefully this explanation helped clear some of the confusion. Don’t be intimidated by MassTransit, it’s a powerful tool and when used correctly, you can solve some difficult problems.
Now I’ll leave this optional exercise for the reader. How does the flow I explained above change if the user pressed “Add Item” again after 5 seconds (for the same user of course)?