In this tutorial we will add a service bus using MassTransit. We will build on this project made in a previous post.
Service Bus?
Without going into too much detail (you can find many websites with more thorough explanations), a service bus lets you send messages (which contain a payload/instruction) for out-of-process handling. They can do a lot more, but we will just be exploring a very simple usage scenario. I plan to make future posts which will leverage more features of the service bus.
The most simple example would be if you have a webpage that is used to generate a report. Typically, as a developer your first inclination would be to generate the report on the fly with each HTTP request. But if the generation can take over 30 seconds (minutes, or even hours), you definitely need to think about processing the request outside of the web server process (eg. IIS can and will behave unpredictably with requests that take longer than 30 seconds). So you may need to adjust your design depending on your system limits and design requirements.
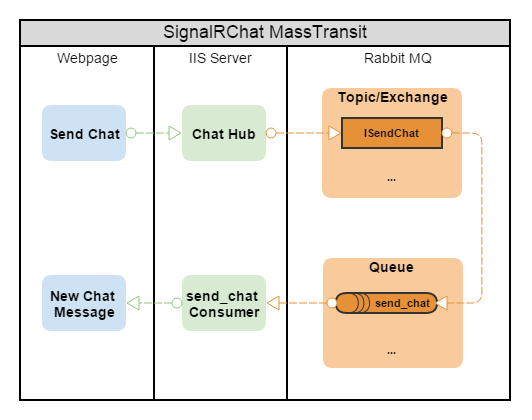
Our goal is to have our message flow look like:
Requirements
For this tutorial:
- We want SignalRChat to be horizontally scalable, and users can chat to each other, even though they might be hosted on different servers (an example of horizontal scaling)
- We will not be running any long processing background tasks (perhaps in a future post I will show an example of this)
- We won’t need distributed transactions (This article has some excellent information related to service bus design)
- We want a Message Queue (MQ) so this project to support horizontal scaling. There are a variety of options for MQ (RabbitMQ, ZeroMQ, MSMQ, NServiceBus, Azure Service Bus), some free and open source, some commercial and fully featured with support options. We will use RabbitMQ, which is free and super easy to setup.
Note #1: An excellent resource where I learned about MassTransit and Service Buses is Loosely Coupled. The blog is made by a highly knowledgeable developer and there is a lot of great information there.
Tutorial
Step 1 – Install RabbitMQ
This is quite straight forward. You will need to install ErLang, because RabbitMQ was made in Erlang.
- You can download the latest Erlang windows binary here (choose 64-bit if your system is, otherwise 32-bit)
- And the latest RabbitMQ server here
Now install the two packages if you haven’t done so already (ErLang first, then RabbitMQ). You can leave all the defaults, they should be quick installs.
RabbitMQ has a fully featured command line tool for managing the service on your machine, but there is an amazingly helpful plugin for a web management interface. To install it:
- Open the Start Menu, start typing “rabbit” then you will see
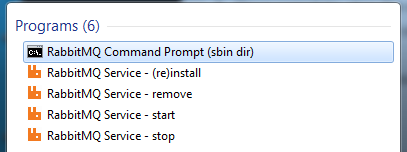
open the RabbitMQ Command Prompt - Now execute the command
rabbitmq-plugins enable rabbitmq_management
- Once complete, stop the service, and start it again (the start menu has both stop and start available for rabbitmq)
Great, you now have a Message Queue working, ready to be configured!
Step 2 – Configure RabbitMQ
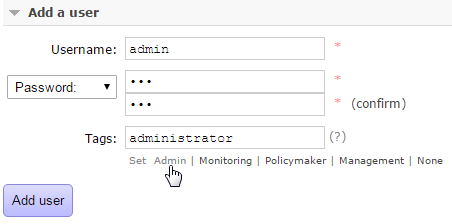
Now open up http://localhost:15672/, and login with the default username/password of guest/guest. The first thing we will do is add our new admin user.
- Click on the Admin tab, and then add a user. Add a user, and give it admin priviledges. I chose to name mine admin, but you can choose whatever name you like.
- Once the user is created, logout of guest, and login as admin.
- Next go to the admin tab, click on the guest user, and then delete it.
Now for this project, we want to make a user and a virtual host in RabbitMQ which our .NET solution can connect with. We could just use the default virtual host ‘/’ and the admin username/password, but its better practice to create a separate account and virtual host.
- First click on the Admin tab, then in the far right, there are three options. You will click Virtual Hosts.
- Add a new virtual host and name it signalrchat
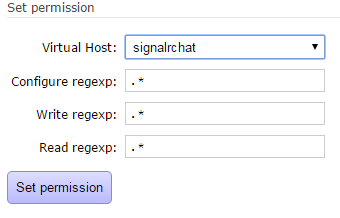
- Now in the far right, click on the Users, and create a new user named signalrchat and give the user ‘monitoring’ privilege (the username does not have to match the virtual host, but I did it that way).
- With the user created, click on them, and then set their permissions for the signalrchat virtual host. Leave .* for configure, read and write. When you actually deploy to a production environment, you might want to lock down priviledges more, but for local development we leave it open. You can read more about RabbitMQ access-control here.
- You can also add permissions for the admin user for both the / and signalrchat virtual hosts.

Great, now RabbitMQ is setup and ready to use with the SignalRChat project!
Step 3 – Lets start coding
I’m going to assume you already have the SignalRChat-Autofac project cloned and ready to go!
- First create a new project in the solution. Make it a class library, and name it SignalRChat.Contracts.
- Delete class1.cs, and make a new folder in the project named ServiceBus.
- Now add a new interface to the ServiceBus directory, and name it ISendChat.cs. The interface should contain:
namespace SignalRChat.Contracts.ServiceBus
{
    public interface ISendChat
    {
        string Name { get; set; }
        string Message { get; set; }
    }
}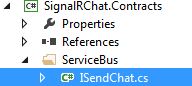
That was easy, and the solution is well organized with contracts separated out in a separate class library, similar to our bootstrapper project.
Step 4 – Publish to the bus (almost)
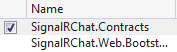
Next, go into the MVC/Web project, and add a reference to our SignalRChat.Contracts project, because we will be publishing and consuming based on that ISentChat contract.
Next open nuget package manager console (or use the gui version). Enter the command:
install-package masstransit -pre
Make sure the target in package manager console is the web/mvc project.
Note #1: At the time of writing this, MassTransit is still in the pre-release phase. You can double check to see if v3 is released or not, and you might be able to omit the -pre flag.
Note #2: I noticed that the MassTransit nuget package has a Newtonsoft Json dependency of 6.0.8, and this doesn’t match our bootstrapper. You can ignore this, but I like my dependencies to match when possible, so I bumped up the versions to all match eachother.
- Now open up ChatHub.cs, and replace the contents with:
using MassTransit;
using Microsoft.AspNet.SignalR;
using SignalRChat.Contracts.ServiceBus;

namespace SignalRChat.Web.Hubs
{
    public class ChatHub : Hub
    {
        private readonly IBus _bus;

        public ChatHub(IBus bus)
        {
            _bus = bus;
        }
        public void Send(string name, string message)
        {
            _bus.Publish<ISendChat>(new { Name = name, Message = message });
        }
    }
}
The IBus interface is provided through Dependency Injection and the message is published based on the ISendChat contract. Notice that I am publishing an anonymous type, which still satisfies the ISendChat contact. Since this is a simple contract and I have no additional logic I want to add, I don’t want to have to implement the contract, so instead I used an anonymous type. Don’t feel forced to use an anonymous type, you can make a concrete class that implements ISendChat and it will still work.
Step 5 – Wire up MassTransit in the bootstrapper
If we were to compile, it would not work because we haven’t wired up MassTransit. You might also get an error about TestClass, we will be removing that next. Go into the Bootstrapper project and open IoCConfig.cs. Replace the contents with:
using Autofac;
using Autofac.Integration.SignalR;
using SignalRChat.Web.Bootstrapper.Modules;
using System.Reflection;

namespace SignalRChat.Web.Bootstrapper
{
    public class IocConfig
    {
        public static IContainer RegisterDependencies()
        {
            var builder = new ContainerBuilder();

            builder.RegisterModule(new HubModule(Assembly.Load("SignalRChat.Web")));

            builder.RegisterModule(new MassTransitModule(Assembly.Load("SignalRChat.Web")));

            return builder.Build();
        }
    }
}
Autofac has a handy Module class that I derive HubModule and MassTransitModule from, so I can separate the registration of each function. Keeps the code nice and clean.
- Create a folder in the bootstrapper called Modules.
- Now create a class inside this folder named HubModule.cs and paste in these contents:
using Autofac;
using Autofac.Integration.SignalR;

namespace SignalRChat.Web.Bootstrapper.Modules
{
    public class HubModule : Module
    {
        private readonly System.Reflection.Assembly[] _assembliesToScan;

        public HubModule(params System.Reflection.Assembly[] assembliesToScan)
        {
            _assembliesToScan = assembliesToScan;
        }

        protected override void Load(ContainerBuilder builder)
        {
            // Register your SignalR hubs.
            builder.RegisterHubs(_assembliesToScan);
        }
    }
}
You’ll notice this load function looks almost identical to what used to be in the IoCConfig.cs, it’s just now within an Autofac Module.
- Next, open nuget package manager console, and run the command:
install-package masstransit.rabbitmq -pre
install-package masstransit.autofac -pre
- The next class will handle all of the MassTransit setup and configuration. Create a class named MassTransitModule.cs and paste in these contents:
using Autofac;
using MassTransit;
using System;

namespace SignalRChat.Web.Bootstrapper.Modules
{
    public class MassTransitModule : Module
    {
        private readonly System.Reflection.Assembly[] _assembliesToScan;

        public MassTransitModule(params System.Reflection.Assembly[] assembliesToScan)
        {
            _assembliesToScan = assembliesToScan;
        }

        protected override void Load(ContainerBuilder builder)
        {
            // Registers all consumers with our container
            builder.RegisterAssemblyTypes(_assembliesToScan)
                .Where(t =>
                {
                    var a = typeof(IConsumer).IsAssignableFrom(t);
                    return a;
                })
                .AsSelf();

            // Creates our bus from the factory and registers it as a singleton against two interfaces
            builder.Register(c => Bus.Factory.CreateUsingRabbitMq(sbc =>
            {
                var host = sbc.Host(new Uri("rabbitmq://localhost/signalrchat"), h =>
                {
                    h.Username("signalrchat");
                    h.Password("yourpassword");
                });

                sbc.ReceiveEndpoint(host, "sendchat_queue", ep => ep.LoadFrom(c.Resolve<ILifetimeScope>()));
            }))
                .As<IBusControl>()
                .As<IBus>()
                .SingleInstance();

        }
    }
}
Line# 19: This statement registers all MassTransit consumers. We haven’t made any yet, so this statement will find nothing.
Line #30: This is where we configure our endpoint, and you’ll notice we have the virtual host /signalrchat that we made. We also have the username and password configured as well. You’ll likely want these in some <appsettings/> config, but we’ll hard code them in for this demo.
We could stop at this point, and publish to the ServiceBus, but we also want to subscribe to a queue
Line #36: This subscribes our consumers(s) to the queue. Remember those permissions we set for the signalrchat user? Well this means that the exchange/queue pair named “sendchat_queue” will be automatically created if they don’t already exist because our user signalrchat has the configure regexp of .*. The other thing to note that all consumers will be resolved with the ep.LoadFrom(…), and depending on your architecture/design, you might want to explicitly state which consumers resolve to what queue. These are more advanced design decisions, but it’s good to be aware of them. - Lastly, open up Startup.cs and add these contents to the end of the configuration method (right after app.MapSignalR):
// There's not a lot of documentation or discussion for owin getting the hubcontext
// Got this from here: https://stackoverflow.com/questions/29783898/owin-signalr-autofac
var builder = new ContainerBuilder();
var connManager = hubConfig.Resolver.Resolve<IConnectionManager>();
builder.RegisterInstance(connManager)
    .As<IConnectionManager>()
    .SingleInstance();
builder.Update(container);

// Starts the bus.
container.Resolve<IBusControl>().Start();
What I discovered reading that stack overflow link, is IConnectionManager is not added to our autofac owin resolver, and so what we have to do here is create a new container builder, get the IConnectionManager from the hubConfig, and register that to our Autofac. It’s not the best, but until there’s a better alternative this will do. Then builder.Update(…) will add this to our existing container.
Step 6 – Peeking under the hood
We haven’t made a consumer yet, and there’s a reason for that. I want to peek under the hood in the RabbitMQ console so we can understand a bit of what’s going on.
- Lets build and debug (F5) our solution
- The webpage home should come up in your browser, navigate to /home/chat
- Enter a username, and then type any message and send it
Now you’ll notice that we don’t have our message echoed into the webpage anymore. This is because we sent it to our service bus, but there is no consumer to receive the message.
- Log into our RabbitMQ management console as admin (if not already logged in)
- Click on the Exchanges tab at the top
- You should see there are three exchanges created, two will be durable, and the xxxxxx-iiexpress-12345…. will be auto deleting.
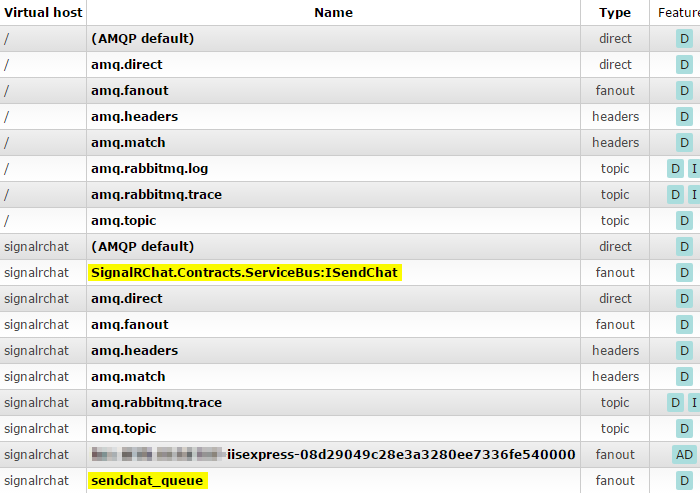
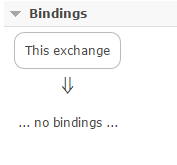
- The message contract is defined as ISendChat, and this exchange will distribute any incoming message to all exchanges that want this type of message. There is no subscription ‘yet’ as you can see if you click on the exchange, so our message that we sent in the webpage was received, but discarded because nobody wanted it.
So lets quickly make a test exchange and test queue to receive this message.
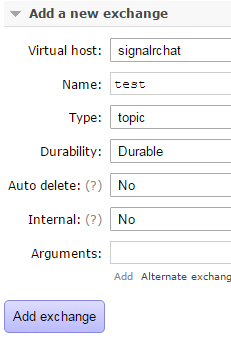
- Create a new exchange in virtual host signalrchat and name it test. Leave everything else a defaults
- Now click the Queues tab in the titlebar
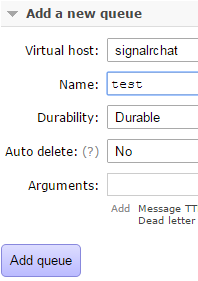
- Again add a new queue, with the same vhost and name as the exchange, leaving all other defaults
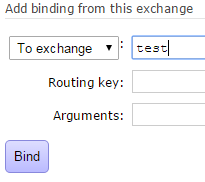
- Next, we need to wire up the exchanges and queues. Click on the Exchanges tab, and click on the SignalRChat.Contracts.ServiceBus:ISendChat exchange
- Add a binding to the test exchange. Leave everything else blank
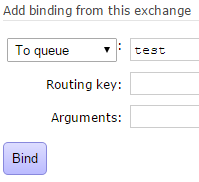
- Now back in the Exchanges tab, click on the test exchange. You’ll notice now there is a “From” binding. We will be adding the “To” binding to a queue
- Now Alt-Tab back to your browser window, and send another chat message
- Then in RabbitMQ, click on the Queues tab and you’ll notice that the test queue has a message ready

- Click on the queue, scroll down to Get Messages and click the Get Message(s) button. This lets us take a look at the payload

Now this seems like a lot of work, and normally we would not have to do this, because once we add our consumer, it will all be wired up automatically for us. But I want you to get more familiar with the RabbitMQ management. It’s a really useful to understand what’s going on, and can help you debug in the future.
You can now delete the test queue and exchange, or leave them if you like. But remember that the test queue will continue getting message and won’t be emptied until you purge it yourself.
Step 7 – Finish up the last consumer
Okay, lets get this last consumer completed.
- In the web/mvc project, create a new folder named Consumers
- Create a class inside the folder named SendChatConsumer.cs and paste in these contents
using MassTransit;
using Microsoft.AspNet.SignalR.Infrastructure;
using SignalRChat.Contracts.ServiceBus;
using SignalRChat.Web.Hubs;
using System.Threading.Tasks;

namespace SignalRChat.Web.Consumers
{
    public class SendChatConsumer : IConsumer<ISendChat>
    {
        private readonly IConnectionManager _connectionManager;

        public SendChatConsumer(IConnectionManager connectionManager)
        {
            _connectionManager = connectionManager;
        }
        public Task Consume(ConsumeContext<ISendChat> context)
        {
            _connectionManager.GetHubContext<ChatHub>().Clients.All.addNewMessageToPage(context.Message.Name, context.Message.Message);
            return Task.FromResult(0);
        }
    }
}
Line# 15: Remember in Startup.cs, we had to independently resolve the IConnectionManager? Well we needed that so we could get it through DI here.
Line #19: Doesn’t this look familiar? The ChatHub.cs used to echo the message back out. We are still doing the same thing, but now the message is being published to the bus, and then consumed by this.
We’ve just made the round trip a bit longer, but with the added reward of a horizontally scalable web application now. Now debug the solution again, and send a chat message. You will see that it now echo’s back out to the webpage as before.
Review
You can find the source for this completed solution here on github. There was a lot of content covered in this post, but here are some of the key takeaways:
- Learned how to start MassTransit and SignalR with an IoC (Autofac) inside an OWIN ASP.NET MVC project.
- Learned how Service Buses + Message Queues can help aid the design of horizontally scalable solutions. This type of design can be used when a multi-tenancy application has high load and throwing more powerful hardware at the problem (vertical scaling) is more costly then running multiple instances with lower hardware specs (horizontal scaling)
- Distributed transactions were not needed for this example (if this topic interests you, you should also read about eventual consistency for distributed computing).
- RabbitMQ web management can be intimidating, but understanding how permissions, vhosts, exchanges and queues work really helps wrap your head around some of the concepts used by the Service Bus.
- MassTransit is a fantastic library, and when combined with RabbitMQ, creates a free, powerful, and scalable Service Bus.
Marvelous, what a website it is! This web site presents useful facts to us, keep it up.
You have brought up a very wonderful details, regards for the post.
Thank you for the tutorial and encapsulating a lot of the moving parts into digestible and understandable pieces.